Yes, at long last we’ve stepped through the various ways of making alcohol and have made it to the hardest to make. Beer. Over the next couple of installments, I’ll be going a bit more in depth on the ingredients used to make beer, but let’s get started with the equipment you’ll need to make a simple extract batch.
To begin with, the first thing we’ll need is a brew kettle. Unlike most other types of fermentation, beer requires being brought up to a boil for a time in order to sterilize it, use the alpha acids in the hops, and to help get a clear beer. Any kettle can work for a brew kettle, as long as it’s large. Most will also have a spigot put into them to allow you to get your wort (unfermented sweet barley water) into a fermentor more easily. Now, most beer recipes for homebrewing are written for a 5 gallon batch, that means if you want to do what’s called a full boil (the full volume of beer is boiled at once), you’ll need at least an 8.5 gallon kettle. Why the extra 3.5 gallons? Well, first you really don’t want a kettle full of boiling liquid full to the brim. Second, you’ll be boiling off water as you get the wort up to a boil, and during the time it’s boiling.
Then, you’ll need a wort chiller. While wort chillers are technically optional, you’d be hard pressed to find someone telling you they aren’t a worthy investment. You can make your own fairly easily as long as you have access to copper (or stainless steel) tubing, a way to bend it, and a way to get hose attachments on to it. Wort chillers are used to bring that boiling pot of wort down to a temperature where it’s safer to move it between vessels, and bring it down to a temperature where you can pitch your yeast.
But Nephilium, I’ve got this 4 gallon pot, and SWMBO (She Who Must Be Obeyed) has said that I can just put an ice bath in the tub to chill my beer. If you can’t do the full boil, you’ll be doing what’s called a partial boil. This means you’ll be boiling a partial amount of your total volume, then topping it off with water. Since the top off water doesn’t have to be boiling it will help with the cooling process. In general, if your tap water is safe to drink, you can just add it directly in for the top off, although that has a risk of infection. If you want to be safer, boil the water once, let it cool, and put it into a sanitized fermentor a day or so before.
Finally, we’ll talk about the two different basic types of malt extract. You can buy it either in a liquid form (LME) or in a dry form (DME). The liquid form will have the consistency of syrup, is slightly easier to mix into hot water, but will spoil faster and is harder to do measurements of. The dry form will have the consistency of powdered sugar, which means it’ll very easily coat things with a sticky mess, but can be kept around much longer as long as it’s kept in an air tight package and away from humidity.
So let’s go with a recipe. This is for a basic Saison, a style that is more descriptive than prescriptive. It is a traditional style brewed in France and Belgium at the time of the harvest, and was used to pay workers in the fields. I’d recommend following the recipe as written once, but then you can adjust it by adding rose hips and lavender, tart cherries, currants, peach juice, or whatever you would like.
Base Saison: 90 minute boil; Final volume 5 gallons
Ingredients:
2 lb. Wheat Dry Malt Extract
3 lb. Pilsen Dry Malt Extract
3 lb. Extra Light Dry Malt Extract
2 oz. Saaz hops
1 package Saison yeast (make sure it’s not a bacterial blend), I’ve had great results with the White Labs WLP565.
~7.25 gallons water (your amount may differ based on different boil off amounts)
Note: If you can’t find DME, you can substitute LME for it, just up the amounts by about 10%.
Method:
Prepare all of your ingredients, you’ll be separating the hops into two amounts 1.5 oz and .5 oz. Get your water up to a boil, then we’ll be adding the malt extract. Turn off the heat, add in the extract and stir. Then stir some more. Make sure the extract is mixed into the water. Get the water back up to a boil, and once it starts boiling put in 1.5 oz of the Saaz hops, and start your timer. 70 minutes into the boil (20 minutes before you turn off the heat) add in the last .5 oz of hops, and your wort chiller (but don’t start the water flow, we want to sanitize it). When your timer runs out, turn off the heat, and turn on the water flow for your wort chiller. You’ll need to move the wort chiller around every once in a while to help chill it down. It’ll take 20-30 minutes at least to chill your wort. If you want to pull a sample to check your gravity, it should be at about 1.060. At that point, move it to your fermentor and pitch your yeast. Let it ferment for 3-4 weeks, as the Saison yeasts can take some time to finish off, and the beer should finish up at around 1.005 (or lower). Saison yeasts are fairly heat tolerant, so you don’t need to worry so much about fermentation temperatures, but just keep the beer stable. After it completes fermenting (remember, 2 checks at least three days apart with the same gravity reading) bottle it, let it condition, and enjoy it.
Some people call me paranoid; I say I’m realistic.
I employ a variety of methods in an attempt to make my online security and privacy somewhat “better.” Will any of these practices stop the NSA from reading my emails and perusing my search history (or prevent them from downloading the 16 million dick pics from OMWC and the Founders that are on my phone)? Highly unlikely. Will it stop the average neighborhood scammer or corporate marketing team from harvesting my info? Maybe. Do I feel better at least trying to salvage some remnant of privacy? Definitely.
Because I believe in learning from my fellow sufferers of PPD, tonight I’d like to hear about what the rest of the Glib community does and recommends.
Under the principle of situational awareness and not being the easy target, there are some basics that should be followed, but I acknowledge there can be exceptions to some things on this list.
Securely password your home wifi connections.
Don’t visit websites with “porn” or “pr0n” in the name.
Don’t use Facebook or other social media, and for the love of all that is holy, NEVER use Facebook Messenger.
Don’t click on HM’s links.
Don’t visit websites that aren’t https.
Turn off Siri and Google Assistant.
Use long passwords.
Don’t use a password on more than one site.
Use two-factor authentication when possible.
Don’t write your passwords down.
Don’t let apps on your mobile devices or laptop track your location.
Don’t store credit cards in apps or online profiles for rewards programs.
Tape over your computer’s camera lens and disable the microphone.
Never click on a link in an email from “your bank.”
Use a separate, secure mailing address for financial purposes (ideally in a zip code different from your home).
Don’t answer phone calls from Unknown Numbers. (In fact, I don’t give my real phone number to anyone. Or, actually, ever answer the phone.)
Don’t hand out your credit card number to everyone.
Buy stock in aluminum foil and learn how to fashion a stylish hat using origami techniques.
Unplug, Faraday cage and cellphone block your IoT devices when not in use, if you must have them in your house. This includes your Amazon FireTV box.
Don’t give your social security number and bank account information to Prince Adesola when he emails you offering a great deal in return for your help.
So, what else do I do?
1. I use a VPN at all times, whether from my home networks, public wifi, or on my mobile devices (even on data). I am currently using ProtonVPN from the ProtonMail folks. To me, it’s worth the small degradation in speed. I have a “Plus” subscription.
4. ProtonMail for email. For my business, I route my domain email through ProtonMail, as well.
5. For basic Internet security, I use Bitdefender, on my laptop and mobile devices.
6. Blur from Abine. I use it for creating masked email addresses on the fly, generating secure passwords to go with them, masking my phone number, masking credit cards. Considering adding their Delete Me service because I don’t have time to track it all down and do it myself.
7. Burner phone for special circumstances. If you are going to the trouble of using one, do so from a location removed from your usual haunts, and nowhere near any of your other devices. While wearing a plain navy blue hoodie and Groucho Marx glasses (or Juggalo face paint), and not near your car or other people.
What do you do to enhance your online security and privacy?
Time to move up the level of difficulty to making something that has a couple more steps… wine. While you can harvest your own grapes, and crush them yourself, in the modern day it’s usually easier to buy a wine kit. You can find kits for making 1 gallon batches or 6 gallon batches. These kits will come with everything you need to make a batch of wine (including a dry yeast packet). The kits will come with a plastic bladder full of grape juice concentrate, which you’ll put into a bucket (or carboy), and mix with warm water to get up to your total volume. Then you stir, and stir some more, and keep stirring to make sure that everything is mixed well. Your kit may come with some packets of items to be added in at this time (wood chips are common), follow your kit instructions here. At this point, you can take a sample and measure your gravity (if you want to know the starting gravity), check the temperature (to make sure the yeast won’t die), and pitch the yeast.
After a couple of weeks, the primary fermentation is done. At this point we want to minimize contact with oxygen, so we’ll move it from the bucket into a 6 gallon carboy. Use a sanitized siphon to move it over, and add any additions that your wine kit say to add. Then put on an airlock, and let it sit for another couple of weeks. Once fermentation is done (check this with your hydrometer), the final gravity will generally be below 1.000.
Now, fermentation should be complete, but we’re not done yet. Next we need to clarify it and degas it. Yeast breaks down sugar into alcohol and CO2, depending on the ambient temperature, some amount of that CO2 will have been absorbed by your wine. Most styles of wine do not have carbonation, so we need to do something to get that gas out. You can either take up more stirring (over 5 minutes, go ahead, count it out) or you can use a degassing wand. These labor saving tools go into your drill, and make degassing much easier. For clarifying, your kit will most likely have a couple of packets that need to be added in a certain order. Follow the instructions (or if you’re really patient, you can wait and the wine will eventually drop clear) with your kit (side note for those who are vegetarian, keep in mind the clarifying agent is where you may find animal products).
Back to waiting for a couple of weeks (or as your kit says) for the clarifying agents to work their magic. Now, you just need to carefully siphon of the wine into bottles (without stirring up that layer of sediment at the bottom), and cork or cap them. If you corked them, stand them up for 3-4 days for the corks to seal, then you can store them on their side. At this point, you’re done and will have around 30 bottles of wine (assuming a 6 gallon batch and standard 750 mL bottles).
Sorry for the lack of recipes this time around. The only non-kit wine I’ve made is beyond the level that I’ve gotten to in these tales. But if you want to follow it, you can find it here.
Let’s move onto something simple and seasonal. Cider. Cider is pretty easy to make, it requires cider (or fruit juice) and yeast. To make hard cider, find cider you like to drink (find ones without any preservatives other than ascorbic acid), and add yeast (this will happen naturally if you let it sit in an area that’s about 65 F but it’ll taste better if you select the yeast and pitch it). I’d recommend buying a batch of yeast from your local homebrew store (it’ll cost you about $8 assuming average prices). Put the yeast into your cider, slap on a sanitized airlock (you remember we talked about both of these things, right?), and let it sit for a couple of weeks. Keep in mind that everything that touches your cider needs to be sanitized, unless you want to make sours, which will be a much longer and involved series of articles.
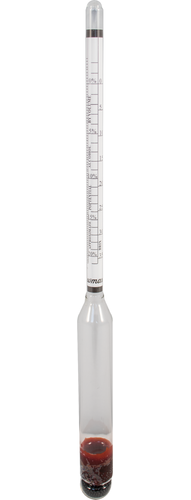
How will you know when it’s done? Time for the next pieces of homebrewing equipment you’ll need. A hydrometer and a wine thief. The wine thief will be used to pull a sample of your fermented cider to test it with the hydrometer (remember to sanitize it). The hydrometer is a device that is used to measure the specific gravity of a liquid. Pure water has a specific gravity of 1.00. Alcohol has a lower gravity (about 0.78), and sugar adds to the specific gravity of a liquid. So those OG and FG written on brewery stats, and on the sides of some of your bottles, are just a measurement of the Original Gravity (measure of how much sugar was in to start) and the Final Gravity (measure of the specific gravity after fermentation). Keep in mind that hydrometers are calibrated to be used at a specific temperature, and if your liquid is a different temperature, you’ll have to adjust that. There’s lots of calculators online to do that math for you. With both the OG and FG of your beverage, you can figure out the percentage of alcohol. If (and only if) you sanitized your hydrometer and sample tube, you can pour the sample but it does increase the risk of infection. Most people just drink the sample (or pour it out).
But back to finding out when your cider is done fermenting, what you want are two readings, at least three days apart with the same gravity reading. Do not bottle without verifying that fermentation is done. Bottle bombs are a real thing, and can be very dangerous. Do not assume fermentation is done because you don’t see any airlock activity or bubbling in the cider.
If you want it to be carbonated, then you’ll need to add sugar at this point (here is a decent calculator, but assume just under an ounce a gallon). Take your sugar, and mix it with boiling water. Then add it to the cider (stirring with a sanitized spoon) and then bottle it. To bottle, you’ll need a siphon (points at the equipment article), and a bottling wand. Bottling wands are a tube with a spring loaded stopper at the bottom. Push it down, liquid flows out. Lift it off the bottom, the bottom locks up. If you’re using swing tops, mix your sugar into your fermented cider (with a sanitized spoon or your siphon), and then bottle. If you need to cap or cork your bottles, I’d recommend filling them all before doing that, or use an orphan assistant for the capping/corking. After that, let them sit for about 3-4 weeks in a room that’s close to 65 F so they condition up (fancy term for letting the yeast eat the extra sugar to make carbonation). Then put them in the fridge and enjoy.
Keep in mind, if you like your first batch, you can easily modify your second batch. Add simple things like ginger, cinnamon, cloves, or whatever. The longer you let the cider sit on the spices, the more flavor it’ll pick up. For your first attempt, I’d recommend no more than 1 tbsp. per gallon, it’s always easier to add more spice, or let it sit on the spices longer, but you can’t easily take the flavor out.
We’ve done a fair bit of talking about guns in these Friday sessions. While we all love fine guns (well, most of us do) and the activities in which fine guns are used, there is always a need for fine cutlery as well. If you hunt, then knives are important for a variety of things, especially after you’ve fired the final shot; that’s when the fun ends and the work begins and a good knife with a good edge will make that work go a lot more smoothly.
But there are many more uses for a good knife, whether your outdoor activities include hunting, fishing, camping, hiking or just lounging around in the outdoors. So, let’s talk about a variety of cutlery for a variety of purposes. Qualifier: This is about knives for hunting, fishing, camping and general outdoor choring; I won’t discuss fighting knives, throwing knives or any other such special-use stuff. At least not in this article.
Sheathe Knives
Two words: Full tang.
Western W36
My Grandpa had a great example of a handmade knife some years back. A local guy who Grandpa had done some carpentry work for during the Depression had no cash but was handy with steel. He had a bar of razor steel and offered to make Grandpa a knife out of that. Grandpa agreed, and the result was a wonder, a full tang (meaning the steel of the blade extends fully into the full profile of the handle, with grip panels on either side) knife with walnut grips. That knife would take an edge like… well, a razor, and would hold it. I remember watching Grandpa hone it, wipe it on his old razor strop, then proceed to slice paper by dropping it on the blade. Sadly, when Grandpa died that knife disappeared along with all his fishing gear and his old Fox double.
About the time Grandpa left us, my folks gave me a Western sheath knife, the old W36 Bowie type blade. That knife not only takes a good edge but (as I know from experience) will hold it through two deer or a cow elk, including not only field-dressing but skinning and quartering. A good solid full-tang sheathe knife like that will do you through almost any outdoor choring you’re liable to run across.
If you’re dealing with either small game or fish, there’s one sheath knife that really stands out; it’s flexible, holds an edge well, it’s lightweight, and it’s not even very expensive; that would be the fine old Rapala fillet knife. Its fine, tapered blade is delicate enough to take thin fillets off small fish and to deal handily with rabbits, squirrels and birds. With the 6” version you can easily field-dress a deer, so long as you have a hatchet or saw to cut sternum and pelvis. But the Rapala isn’t really a big game knife; it’s with small game and fish that the Rapala shines.
Some things to look for in a fixed blade sheath knife: A full tang, a stout blade (it shouldn’t be thin or whippy, unless it’s a fillet knife, when a thin blade is needed) and a good hilt to keep your hand from sliding up onto the edge.
Rapala Knife
Folding Knives
Two words: Buck 110.
Buck 110
There are many folding hunters by many manufacturers (Schrade in particular makes a very good one that is a doppelganger of the Buck 110) but the Buck 110 Folding Hunter is the gold standard by which all such folding hunting knives are measured. It has a fine stainless blade that will take and hold a good edge while literally (as Buck commercials used to show) being tough enough to survive being hammered through a nail. I have one that I have carried since I was about sixteen; I’ve dressed deer, antelope and javelina with it, along with all manner of smaller critters. It rode my belt through my Army service and saw duty there for everything from opening MRE packs to (closed) rapping on the crew doors of armored vehicles to get someone’s attention.
Buck, Schrade, Case and a number of other manufacturers make good solid folding hunters. I suppose there may be some off-brand blades that are of acceptable quality, but I have yet to see one. I have a small 3” folding knife that carries the Winchester name and according to the blade was made in China (what the hell isn’t?) and it’s of pretty good quality. I was given that knife as a gift back when Winchester was still Winchester; I can’t speak for the quality of any such knives now, if indeed such a thing is still available.
Some things to look for in a folding knife: A solid riveted hinge, a secure lock, and good brass or steel on each end of the knife. A quick-opening feature can be handy but isn’t essential, but a good lock is – you don’t want the knife folding up on you when you’re elbow-deep in elk guts.
Pocketknives
Two words: Swiss Army.
Sometimes I think there are many variations on the Victorinox Swiss Army Knife as there are stars in the sky. You can get a cheap little inch-and a half version with a tiny blade, a file and a toothpick, you can get a massive version with screwdrivers, a corkscrew and a magnifying glass, and everything in between. One thing you can count on; if it says Victorinox on the knife, it will be a good buy.
When I was a kid the Barlow was something of a standard among the farm kids, hicks, rednecks and roustabouts I grew up with. They were good for whittling, cleaning fish and small game, or any of the other thousand and one tasks for which we needed a cutting instrument. Those knives are now made by Schrade and are still a good handy pocket knife.
Some things to look for in a pocket knife: Light weight, portability, a good stainless blade (440 is the best) and a handle big enough to make for a good safe grip. Multiple blades are handy but not essential.
Oddballs and misfits
I can’t summarize this in two words.
Herter’s “Bowie.”
Those of us old enough to remember the old Herter’s catalog (the real Herter’s, not the purveyors of junk that have somehow acquired the name now) will remember that old George Leonard Herter had some very distinct ideas about outdoor equipment, and knives were no exception. I have one of what old George called the Herter’s Bowie knife, which isn’t at all like Jim Bowie’s classic design but instead looks more like a steak knife. But looks aside, the old Herter’s sheath knife has a stout, thick stainless-steel blade of good quality steel that holds an edge well; its lack of a guard makes some caution in handling necessary but it’s a good solid outdoor knife. Mine has been used to dress out few eastern whitetails back when I lived in Iowa, and always performed well.
The Wyoming Knife is another oddball, this one a specialty device meant for one purpose: Field-dressing and caping big game animals. It’s a funny-looking thing. While I’ve never used one, I have used knives with a back-hook meant for field dressing, and it’s handy to be able to quickly and smoothly unzip a deer, elk or antelope. It makes for a nice clean process, or at least as clean as field-dressing can be. Now that I think on it, I may have to try a Wyoming knife next season.
And don’t overlook such multifunction tools as the famous Leatherman. Plenty of military folks carried one when I was in back in the Cold War Army, Mrs. Animal among them. While it’s not really a “knife,” they do have knife blades along with all the other various and sundry tools found in the device. It’s a handy thing to have around and while I don’t carry one on my person as a rule, one does live in the tool box in my truck.
Wyoming Knife
And so…
And, finally, some unsolicited advice. For those who frequent gun shows or any other kind of outdoors trade venue, or even if you look in the glass cases in many gas stations and truck stops, you’ll see a wide variety of knives for sale at some incredibly low prices. Believe me when I tell you, they aren’t worth even the few dollars they charge for them. They might make decent paperweights, but as practical cutting instruments they aren’t much good.
Most of them are made from Chinese, Pakistani or Indian steel that is unevenly tempered and full of cinders. If you can manage to get one to take an edge, it won’t hold. Don’t bother. Pay some more, get a good quality knife from a reputable maker, and you’ll never regret it.
There’s an exception: If you know a knife is going to be abused, don’t spend a lot of money. My Dad kept several cheap pocketknives in a drawer, rarely having paid more than a couple of bucks for them. He used them for scraping paint, for prying, for digging, whatever his choring around the place required, and when one broke – they inevitably did – he would toss it in the creek, go in the house and grab another. While there’s an exception for every rule, that’s the only one I can think of in this case.
A knife is (or should be) a serious tool for serious business. You don’t have to go broke buying one, but neither should you cut corners. Pick carefully and you’ll have a good solid piece of cutlery that should last a lifetime.
The beer you’ll all want to hear about is the one mexican sharpshooter reviewed here, and he got accused of trolling for his efforts. I can relate.
This is my review of the Autumn BIF.
I too have had my sincere opinions dismissed as the contrarian trolling of a prog plant simply because I won’t toe the line and accept the Republic… er… Glibertarian narrative. In fact, I put up with a lot of bullshit around here. There’s no need to rehash the whole Logo fiasco, I’m over that, but what about the Glib specific ‘First’ GIFs I created for the site. Zardoz still trots his out occasionally but that’s it, I can’t remember the last time my Thicc Edit Fairy GIF was used, and I don’t think they ever used my favorite ‘First’ GIF ( the one with the “winking” cat under the One’s top hat). I can handle it though, I’ve had decades of practice accepting rejection. I could mention how I single-handedly ushered in the golden age of commenter submitted articles with a legendary drunken rant, but why bother? What thanks did I get, a nice little e-mail asking me to stop submitting articles that’s what. Oh and you guys are happy to hit me up for construction advice, yet I’ve baked more pizza than any ten of you combined have eaten, I gave you my secret dough and one-of-a-kind sauce recipes, hell, I helped Trashy with his soggy crust problem, and am I respected as a master pie man? Am I fuck. The indignities are almost too many to list. I get no credit for my puns in the pun threads, which are actual wordplay not just using a word related to the theme in its normal way… “Oh a fish themed pun thread, I’m going to add ‘he took the bait’ ha-ha”… How is that even a pun? I mention all that just for the Halibut, it was all water under the bridge. Then mexican sharpshooter tries to poison me, sealing used motor oil thinned with turpentine in a beer bottle.
You mean this guy?
I may not be able to take a hint but I’m not totally obtuse, so I’m pulling an ‘Eddie’, well maybe not an ‘Eddie’, I’m not going to request that the editors scrub the site of my submissions, and I’m not going to exchange nasty emails with the founders (unless they’re into that kinda thing) but I’m definitely pulling a ‘The guys who’s avatar was a naked dude on a futon with some guitars.’ I hope you assholes enjoy your echo chamber.
How were the other beers?
The Husstler Series American Lager Huss Brewing Co. – classic lager could see this as an everyday beer 3.167
Koffee Kölsch Huss Brewing Co. – A light colored coffee beer? yup, kind of odd flavor and visual combination but very good 4.135
White Russian Imperial Coffee Stout Sunup Brewing Co. – Ah that’s more normal, coffee flavor in a dark beer, not as good however and more chocolatey than coffee 2.997
Noche Dulce Moonlight Vanilla Porter Borderlands Brewing Co.- By far my favorite of the bunch great taste, hints of coffee/chocolate/vanilla but not slapping you in the face 4.835
Moon Juice Galactic IPA SanTan Brewing Co. – It’s an IPA, I guess there are some fruity undertones, but it’s an IPA 2.417
Thanks to mexican sharpshooter for the beers and Neph for setting this all up. looking forward to the spring B….oh wait I’m outta here, Auf Wiedersehen jerks!
Once again, I am going to search the comments and distill the ones most likely to be an effective writing prompt.
Which upon the dreaded realization that at the time it was August and they already had pumpkin beers out, you can probably appreciate my self-control for waiting until October to actually put this out for general consumption.
This is my review of Southern Tier Pumking Imperial Pumpkin Ale. H/T Bob Boberson
Of course, this also means that there were number of others things about October that people have little self-control in talking about—namely Halloween. Which means today we are going to discuss the top 7 libertarian Halloween costumes, because 7 makes sense.
#7 (slutty) Rape Apologist
This one is actually pretty easy to complete. Just dress up as a lawyer if you happen to be a unicorn female–bonus points for showing a little leg. If you happen to be a libertarian male, just wear what you are wearing anyway, and leave your pants open. The key for both is to simply demand hard evidence for everything, and in every conversation. For example, did somebody spike the punch? Demand evidence that it was spiked, or that there was even any punch to begin with.
#6 Rick Sanchez
I don’t know why Rick is libertarian, to be honest. I never watched the show, but I am willing to entertain any arguments as to why or why not.
#5 (slutty) Gender-Fluid Handmaidens Tale
Again, this is also a simple to costume to create. Get a red smock, a bonnet and grow a beard. Once again, bonus points for showing more leg than required.
#4 (Slutty and/or Gender-fluid) Ayn Rand
Objectively, this costume is superior to all the others, because it allows for a level of morality…okay I can’t do it. If you have the stomach for it, I WANT TO SEE IT. The downside, is everybody asking you why you are dressed like a peasant lady.
#3 Kochtopus
Amazon has plenty of octopus costumes for which you can wear, add top hat and monocle accordingly. However, you can take it to the next level by creating this lovely top hat with tentacles sticking out of the top. Simply add a monocle, some body paint, and you are golden.
Things will get real ugly
#2 Walt (Gran Torino)
Halloween means a bunch of kids are going to be running around your lawn; there is only one effective way to keep them off your lawn and that is a M-1 Garand from your days in Korea and explaining it to them you wish for them to get off your lawn. If you prefer to chase them down, a Colt M1911 A-1 to the face after tackling those damn kids, will also do the trick.
#1 Zombie John McCain
Too soon?
My friends, BRAAAAAAIIIIIIIIIIIIIIIIIINS!
Its never too soon, Cowboy.
So is this beer any good? You will not like it if you are not down with pumpkin ales. I however, happen to enjoy and appreciate the history behind the pumpkin ale therefore I will likely purchase this one again. This one is intense in its alcohol content and does not apologize for anything, just like all of these costume ideas. I give Southern Tier Pumpking Imperial Pumpkin Ale a solid 4.5/5.
Not too long ago, I asked in the comments what the commentariat’s favorite stretch of road is. The answers ranged from US 7 in the Massachusetts Berkshires to Highway 95 to Zzyzx in the Mojave Desert and everything in between. That post was a lead up to this article which I’ve been planning for some time. Most of my submissions to the site have been self-important, bloviating, pseudo-philosophical dreck best left to stoned college sophomores. For a change of pace, I thought I’d write a simple love letter to my favorite stretch of road, along with some purty pictures.
The Silver Thread
I speak, of course, of the article’s eponymous road, The Silver Thread, aka: CO-149, one of Colorado’s Scenic Byways.
Cute, likes you and never says “no”.
Beautiful when she lets down her hair.
I have been traveling this road to the Undisclosed Location since I was six months old and it will never be replaced in my heart as my favorite drive. While it’s most definitely beautiful, it’s more like the cute and comfortable girl-next-door. Not the popular cheerleader like US 550 from Durango to Ouray,
She’d rather be with the quarterback.
or the unattainable bombshell like the Richardson Highway from Delta Junction to Valdez.
Wouldn’t give you the time of day.
It’s not seductively dark and mysterious like the Redwood Highway,
Who knows what pleasures lie in those curves?
nor exotic and sensuous like US 1 from Miami to Key West.
¡Muy caliente!
Nevertheless, it is “my road” (not really, but I think of it that way), and I think it’s as beautiful as the day I met her.
This 117 mile stretch of road runs from South Fork to US 50 just west of Gunnison. In the process it goes over two passes: Spring Creek Pass, 10,898 feet where it crosses the Continental Divide,
Pee in both the Gulf of Mexico and the Pacific simultaneously.
and Slumgullion Pass, 11,530 feet.
Before.
Slumgullion is in an area that has been hit the hardest by the spruce beetle epidemic and the picture above shows it before the epidemic hit. The following picture is after.
After.
This is what a good realtor would call “emerging views”. The road also passes through the charming old mining towns of Creede and Lake City.
Creede.
Lake City.
In my opinion, of the two, Lake City is the more scenic and has the bizarre story of Alferd Packer, the legendary cannibal and subject of Trey Parker and Matt Stone’s first foray into writing (“Cannibal: The Musical”). It also sits at the base of five of Colorado’s Fouteeners; Uncompahgre Peak, Wetterhorn Peak, Handies Peak, Redcloud Peak and Mt. Sunshine.
Creede was the more productive mining town and has more Wild West heritage, counting Soapy Smith, Poker Alice, Bat Masterson and Robert Ford among its previous residents. Lake City gets its name from Lake San Cristobal, a natural lake formed when about 10,000 years ago a massive landslide, called the Slumgullion slide, broke off the mountain and dammed up the Gunnison River.
Lake San Cristobal.
Slumgullion Slide.
Lake City is also the gateway to the Alpine Loop, a great 4×4 trail that loops from Lake City to Ouray to Silverton and back to Lake City.
Top of Cinnamon Pass in the Alpine Loop.
Beginning of Engineer Pass in the Alpine Loop.
Fall colors on the Alpine Loop.
The Silver Thread represents my little slice of Heaven of hiking, shooting, fishing, offroading and drinking. Driving on it always means that I can look forward to what it’s all about.
Most folks who play around with shotguns know that, back in the day, there were a lot more shotgun gauges available than there are now. These days the 12-gauge is riding tall in the saddle, with the 20-gauge doing duty as a gun for youths and the small-framed, and the old .410 bore (not gauge) finding some use among elite skeet shooters and kids learning the business.
What happened to those other gauges? As recently as the post WW2 years, the 10 and 16-gauge loads were still seeing plenty of use. The 16 still remains popular in Europe, at least in those localities where the peasantry are allowed to own fowling pieces. But Stateside? Those have mostly faded out, leaving the 12 and 20 holding the bag. The 24 and 32-gauge guns were never popular Stateside (although I just examined a lovely 32-gauge double in a New Jersey gun shop the other day) and the big 4 and 8-gauge guns were mostly used by market hunters, not sportsmen. The odd little 28 is still around, and new guns aren’t too hard to find, but like the .410 it’s mostly used on the skeet ranges and quail fields; unlike the .410 it’s not found much in youth-type guns.
But the highly useful 10 and 16s are not much in use these days. Why? First, let’s run through some background on shotguns.
What Do Shotgun Gauges Mean?
Shell sizes, including a couple of real monsters.
Gauge as measured in shotguns is an archaic measure of bore size. A shotgun’s gauge is defined as the number of pure lead balls, the bore size of the gun, that it takes to add up to one pound. For modern purposes, bore sizes for the several gauges are defined as:
10 gauge: .775
12 gauge: .729
16 gauge: .663
20 gauge: .615
28 gauge: .550
The .410 is the odd man out, being defined by the actual bore size. Interestingly, the .444 Marlin rifle cartridge was originally loosely based on the .410 brass shotgun case, and there are revolvers ostensibly chambered for the .45 Colt that will also chamber and fire 2 ½” .410 shells, which strikes me as a solution in desperate need of a problem; but, as my Grandpa used to say, every cat its own rat.
A recent (as in, post-WW2) development in shotgun loads is the addition of lengthened “magnum” hulls. The 3” 12-gauge was first, followed by the 3” 20-gauge, the 3 ½” 10-gauge and finally the 3 ½” 12-gauge Roman candles. The .410, originally a 2 ½” case, had a 3” version developed, while the 28 and 16 gauges never joined the fun, still being available only in 2 ¾” versions. This is significant for reasons we’ll go into in a bit.
Guns and Loads
This is where we run into one of the reasons that the 10-gauge faded out. The 10-gauge was mostly favored by waterfowlers, who generally are stationary in a blind and not hiking over hill and dale looking for birds like upland hunters. There’s a good reason for this; geese and even ducks are tough, heavily feathered birds who take some knocking down, and even the old 2 7/8” 10-gauge loads threw big charges of heavy shot idea for this task. But the guns made for the big 10 were mostly large, long, heavy doubles, some weighing as much as 10 pounds. In the late Seventies the 10 saw a bit of a renaissance with the introduction of the Ithaca Mag 10, and later Browning introduced a 10-gauge version of its BPS bottom-ejection pump-gun in 10-gauge. But both guns remained big, long and heavy; I’ve fired an Ithaca Mag 10 and it’s like swinging a telephone pole.
The introduction of the 3” magnum 12-gauge and, later, the 3 ½” sealed the fate of the big 10. Now a hunter after a variety of game could buy a 12-gauge light enough to tote in the upland game fields that would still handle heavy magnum loads suitable for waterfowl or turkey.
With this, the 10 has kind of faded into the sunset. You still see them in the hands of hardcore waterfowlers, and ammo is still readily available, but the big 10 is now strictly a niche market item. And that’s too bad, because a hardcore waterfowler would be hard pressed to find a better gun for big Canada honkers or fast, tough mallards than a 3 ½” 10-gauge shell throwing two ounces of bismuth shot. The Browning BPS-10 is still available factory-new, and there are plenty of Ithaca Mag 10s and its later development, the Remington SP-10, on the used gun market.
But the sweet 16? That’s a whole ‘nother thing to ponder.
The big, tough action of the Ithaca Mag-10.
Why? Because none of the niche market criticism of the 10-gauge applies to the 16. The 16 may well be the perfect happy medium in shotguns. It can be chambered in small-framed guns, as Browning did in the famous Sweet Sixteen version of the Auto-5; that fine gun put the 16-gauge shell in a gun using the small frame designed for the 20. I have one and it’s a joy to handle, almost a full pound light than its 12-gauge counterpart. Ditto for the 16-gauge Model 12 Winchester.
The 16, in a stiff field load, packs plenty of wallop for big ringnecks and sage grouse, while the light, handy 16-gauge guns are light and handy enough for grouse, quail and doves. My 16s are great for just those things; Mrs. Animal is a fan of the 16 as well and has two, a newer Citori White Lightning from a limited run in that chambering and a 1950s-vintage Ithaca 37. Up through roughly the late 1950s, plenty of American bird hunters agreed and the 16 remained popular.
So, what happened? Three things: The increasing popularity of trapshooting, the 12-gauge 3” magnum and the 20-gauge 3” magnum.
Trapshooting is and always has been a 12-gauge game. The 12’s bore is just enough larger than the 20 or 16 to toss a one-ounce load of 7 ½s in a nice, tight compact pattern with a short shot column, ideal for powdering clay birds. In light trap loads recoil isn’t an issue, and dedicated trap guns can be heavy enough to eliminate even that bit of kick. But more to the point, the increasing appearance of trap ranges at American gun clubs led to a lot of folks taking their field guns out to the trap range to get some practice in, and the nature of trap shooting over the much more predictable skeet made it better practice for wing shooting – at least, until the advent of sporting clays.
But ammo – that’s where the bite really came, and when it came, it came from two directions. And in this case, it wasn’t so much the new 3” mags in 12 and 20-gauge as the 16’s sin of omission in not doing the same.
Following the advent of the 3” magnums in both 12 and 20-gauge, shooters who may previously have chosen a 16 as a great gun-of-all-trades no longer had as much incentive to do so. The 12 was suddenly now much more versatile, coming close to rivaling the 10 as a duck/goose/turkey gun while retaining utility that the 10 lacked for upland game, a trend continued by the later lengthening of the 12-gauge chamber to 3 ½”. For a shooter looking for one gun for all work, the 12 was now the clear choice; I’ve said as much myself, that if a person can only afford one gun, period, end of story, then that person should go forth and buy a 12-gauge pump shotgun.
Moving down the size spectrum, young shooters and those with small frames now had greater reason to choose the 20 over the 16. Both rounds were available in light, small-frame guns but suddenly the 20 opened up with a much wider variety of ammo available, including some loads that approached the level of older 12-gauge 2 ¾” field loads.
Meanwhile, the 16 languished in its 2 ¾” hull length, and sales of guns and shells declined. In the early 1970s, Winchester dropped production of its excellent AA trap loads in 16 gauge, and thus one of the last sources of high-quality low-brass 16-gauge hulls dried up; nowadays Winchester, Remington and Federal are still loading 16-gauge rounds but mostly in field versions with cheap, crappy promotional ammo dominating. Fiocchi still loads a variety of 16-gauge loads as the round is still more popular in Europe than here in the States, so the 16-gauge fan still has some options, but non-toxic loads for waterfowl are pretty limited, and new guns are not much in evidence.
The Upside
16 Gauge Model 12
Yes, there’s an upside to all this, especially if you’re a 16-gauge fan or are in the market for a big, powerful waterfowl-buster. What’s that upside? The market!
10- gauge and 16-gauge guns aren’t in much demand these days. There are some exceptions; the Browning Sweet Sixteen Auto-5, especially Belgian guns, still commands a premium price, mostly because of collectors (like me.) But Browning BPS-10s aren’t terribly expensive on the used gun market; Winchester Model 97s and Model 12s as well as Ithaca 37s and Remington 11s are readily available in 16-gauge versions and often at attractive prices.
And there’s hope, at least for the 16. The new, supposedly improved (and in my opinion, uglier) Browning Auto-Five is now available in a Sweet Sixteen version; the Browning Citori and the various CZ doubles are available in that gauge as well. Could we be seeing a minor renaissance in the best of all mid-range shotgun loads? Maybe. Time will tell.
The “Other Gauges”
Obscure gauges like the 24 and 32 were never popular in the United States. In the case of these oddballs, it’s not a matter of them fading out as much as that they never faded in in the first place. But could these in-betweeners be useful?
Sure. The aforementioned 32-gauge European double I examined the other day would make a sweet little item for hiking hills and swales for grouse. Fiocchi still loads 32-gauge shells, although loads are limited to a #6 field load and a lighter upland load with #8 shot; but this pretty little tiny-framed double with its graceful slim barrels and its lovely European walnut stock really belongs in the field, not languishing in some gun shop’s rack where it won’t likely move because of its odd chambering.
The 24, on the other hand, is one where I can’t really offer much information. As far as I’ve been able to determine the 24 isn’t loaded by anyone anymore, and I couldn’t tell you the last time I stumbled across a 24-gauge gun. While the 16 was left behind by advances in neighboring gauges, the 24 seems to have died a death of apathy.
In Conclusion…
Old shotguns are fun.
Now that I’m done belaboring the obvious: Just because a certain shotgun gauge is no longer popular doesn’t mean it’s not useful. Mrs. Animal and I have a lot of fun with our 16-gauge guns, and after our move to The Great Land, I may be in the market for a big 10 to bust tough northern geese for the table. I’d love for Winchester to bring back an AA trap load in 16-gauge, but then I’d love for someone to bring back the .25 Stevens rimfire again – or even bring out a nice new light lever gun in the .25-20. I probably won’t get any of those things, but the world’s got no shortage of windmills to tilt at.
If you have some extra bucks to indulge in a shooting addiction, don’t overlook the 16. The story of the oddball gauges is an interesting one and, given the changes in technology and markets, may have been inevitable, but that doesn’t mean they aren’t worth another look.
A serious shoutout to our biggest financial supporter: Egould. Buddy, you’re keeping the site running.
Need a piece of clothing guaranteed to scare the kids at Halloween, piss off your family at Thanksgiving, or to gift the people you hate over the holidays?
And look. We had our quarterly board meeting the other night. We’re not operating on a hookers and blow budget. We’re not operating on a meth and lot bunnies budget. We’re operating on a suck your dick under the highway overpass for spare change budget. Every product you buy is one less dick we have to suck to keep this place running.
All joking aside, we’ll always find a way to keep the lights on here, but if you’ve enjoyed something, this is one way to show the love. And generate new Tulpas. And be recognized by other closet glibertarians if you live in the Minnesota/North Dakota or LA area.
As a reminder, it is the policy of the board who operates this website donates any money above what is needed to operate the site for a prudent amount of time (I think six months, but I forgot to check) to a worthy charity each year. Last year it was Institute for Justice and FIRE who got our money. We will run some options by you right after Thanksgiving to make donations for next year. So there’s another reason to buy swag.
UPDATE: This page will remain up until 3:20 CDT so the afternoon links participants can all see our pitiful begging at the top of the page. After that, there will be… LINKS!

 To begin with, the first thing we’ll need is a brew kettle. Unlike most other types of fermentation, beer requires being brought up to a boil for a time in order to sterilize it, use the alpha acids in the hops, and to help get a clear beer. Any kettle can work for a brew kettle, as long as it’s large. Most will also have a spigot put into them to allow you to get your wort (unfermented sweet barley water) into a fermentor more easily. Now, most beer recipes for homebrewing are written for a 5 gallon batch, that means if you want to do what’s called a full boil (the full volume of beer is boiled at once), you’ll need at least an 8.5 gallon kettle. Why the extra 3.5 gallons? Well, first you really don’t want a kettle full of boiling liquid full to the brim. Second, you’ll be boiling off water as you get the wort up to a boil, and during the time it’s boiling.


 How will you know when it’s done? Time for the next pieces of homebrewing equipment you’ll need. A


 are going to discuss the top 7 libertarian Halloween costumes, because 7 makes sense.
 #5 (slutty) Gender-Fluid Handmaidens Tale
 #3 Kochtopus


