Category: Guns

  • Stone Wall and Sudley Ford: A photographic tour of Manassas Battlefield National Park

     
    I want to start off with a few mentions. First off, thanks to Yusef for the diorama posts. I wouldn’t have bothered writing this article without your articles showing the interest the glibertariat has in historic battles. Thanks also to straffinrun for encouraging me to snap some pics and linking the Mises podcast.

    The Mises podcast is absolutely kickass and worth a listen.

    Part 1
    Part 2

    Part 3
    Part 4

    Part 5
    Part 6

    I’ll preface the bulk of this article by saying that I’m no expert on the Civil War, and I may get some details wrong.

    Also, I highly recommend the following atlas if you are a civil war buff.


    Here’s a basic view of the area surrounding the battlefield:


    Now we zoom in to the battlefield.


    I annotated the map to include some of the important landmarks:

    From east to west between Henry Hill and Matthews Hill is the Warrenton turnpike. From north to south between Henry Hill and Chinns Ridge is Sudley Road.

    I spent all of my time on Henry Hill, as I had my 1 year old with me and didn’t want to cross US 29 (Warrenton Turnpike) with her to walk Matthews Hill. These images are all hi res, so you should be able to zoom in by clicking on the images. Edit: the site choked on my super hi res images, so these are lower resolution but still clickable.

    The Museum at Manassas
    Looking East across the top of Henry Hill. Bull Run is about 1/2 mile into the woods.
    Looking North from Stonewall Jackson’s statue at Henry House.
    Henry House with Bull Run mountains in the distance
    Still looking North at Henry House, Matthews Hill can be seen on the top right of the image

    The above image is a bit deceptive. There is a large valley between Henry House and Matthews Hill.


    Henry House and a monument to the battle
    Turning to the East, you can see a Union artillery line
    Union Cannons
    Confederate Artillery on the West side of Henry Hill pointing east
    From the Confederate Artillery to the Union Artillery is maybe 1/4 mile west to east
    Mrs. Henry’s grave at Henry House
    Henry House
    You can go into some of the houses, including Henry House and Matthews House
    Looking East from Henry House. Stone Bridge is buried in the distant woods out of sight.
    Matthews House at the base of Matthews Hill. Warrenton turnpike passes right in front of the house

    Chinns Ridge is back in the woods to the West across Sudley Road. I didn’t make it back there.
    Working East along a loop around Henry Hill, there are info boards in various places.
    Northeast of Henry Hill is Robinson House, which is around 200 yards away from Warrenton Turnpike
    The foundation of Robinson House
    Working back South toward the Union Artillery
    Another info board
    View from the Union artillery West toward the Confederate line

    Natural Beauty
    Sudley Church
    My photography assistant


    A picture is worth a thousand words, so this is like a zillion word article! Let me know if you have any questions or want to see something more in specific.

  • The Steps – Reloading, Part 5

    Read the series


    This article is for informational purposes only. Suthenboy is not a credentialed expert. Do not attempt any of these activities without first consulting an expert or a manual published by accredited experts or manufacturers.


    Get ready to start loading!

    Sizing

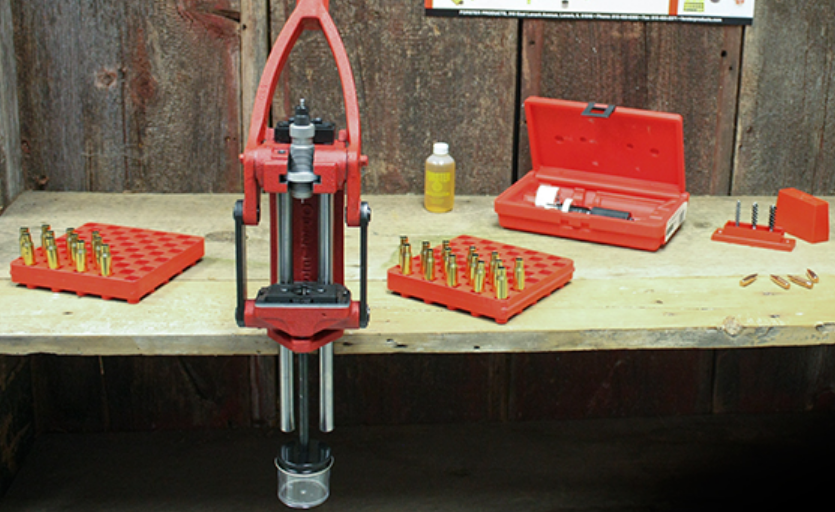
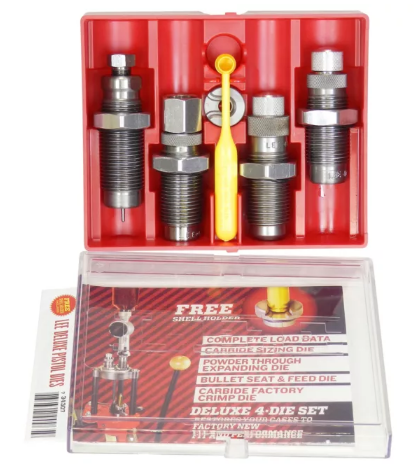
    In a standard die set the first die is the sizing die. When firing a brass case expands and seals off the gun’s chamber like a gasket. It bounces back after the pressure drops but not all the way back to original size so the first thing to be done is to size it back to specifications. With a straight wall case carbide die this is fairly simple. Screw the die into the press until it touches the shell holder with the press in the up position then back it off about half of a turn. Make sure the pin of the center punch extends past the opening of the die but the stem of the punch does not. Place the case in the shell holder and pull the press handle a full stroke. If you meet solid resistance before the stroke is complete stop and back the die off a little bit. The die will size the case to specs and the center punch in the die will decap (remove the spent primer) the case. Run all of your cases through the die.

    With shouldered cases you must first lightly lubricate them. I use a lubed Q-tip to swab the inside of the case neck. I put a drop or so in the palm of my hand then line 6 to 8 cases in the palm of one hand. I put my hands together and rub them back and forth in a hand-warming style motion until the lube is evenly distributed on all of the cases. This method goes pretty fast. Make sure the lube is light or the excess lube will create a ripple like surface on the brass, ruining it. A trace amount is all that is needed.

    Some rifle die sets will have two sizing dies, one for sizing the neck and the other for sizing the body, making sizing a two-step process. I prefer the one step dies but I am not a benchrest shooter.

    After sizing the cases must be cleaned. As I mentioned the brass case expands during firing and becomes a brass gasket to seal off the chamber. To do this it must expand and grip the walls of the chamber. If there is lube on the case you would have the same effect as if you oiled your brakes. The bolt of the gun cannot hold the pressure. It is not designed to. It is the brass case gripping the walls of the chamber that holds the pressure. If the brass ruptures or cannot grip you may find tens of thousands of pounds of pressure escaping in your direction. This can ruin your day. Clean your cases well.

    Priming

    Various formulations (lead styphnate, antimony sulfide, barium nitrate plus secret ingredients depending on the manufacturer) are used for priming material but the first thing to know about all of them is that they are extremely sensitive to decomposition. The primary explosive in primers must be sensitive enough to ignite upon being struck by the gun’s firing pin. This means these formulations are much less stable than the secondary incindiary material – the gunpowder. You should never touch primers with your fingers. Even trace amounts of oils, water or salt from your fingers can cause the priming material to become inert. Touch a primer and you end up with a dud round or worse, delayed ignition. I keep tweezers on hand at all times to manipulate loose primers. Also, that instability means you should never subject primers to shock or heat. If you have one go off you will be surprised how much bang one of those tiny caps have.

    *Priming material is a very powerful explosive. Historically primers were assembled in small, one person sheds surrounded by sandbags. Only women were hired to do this tedious job because women can sit comfortably and focus for long periods of time much easier than narrow hipped men can. Thankfully today they are manufactured in unmanned facilities by remote control.

    Make certain that you have the proper primer for your load. Small differences in primer operation make big differences in how the gunpowder burns. Never use magnum primers for standard loads. There are:

    Small pistol
    Small pistol magnum
    Large pistol
    Large pistol magnum
    Small rifle
    Small rifle magnum
    Large rifle
    Large rifle magnum
    Various specialized formulations such as military primers

    Again, always make sure your primer matches the load you are making.

    Priming tools, either hand squeezed or lever operated, use a small plunger to press the primer into the case’s primer pocket. In both cases very little practice is needed to get the feel of properly seating a primer. I used to sit in front of the television with 500 or 1000 batches of brass and do the operation almost entirely by feel while watching TV. Make sure the mouth of the case is facing away from you, other people, pets and especially from your store of other primers or gunpowder. Press the primer in and then after each one run your finger over the primer to make sure it is properly seated. It should feel just slightly below the base of the case. If it is not in far enough it will cause revolver’s cylinders to jam as the primer will rub against the frame and in rare cases could be set off in semi-autos by being struck by the slide upon feeding. You don’t want to have one go off before it is fully chambered. Make sure they are fully seated.

    Another safety tip: If you try to fire a round and you only get a click DO NOT IMMEDIATELY OPEN THE GUN AND REMOVE THE DUD ROUND. Keep the gun pointed in a safe direction and wait for half a minute or so. It is possible to have a hang fire, that is delayed ignition. Don’t be this guy:

    https://www.youtube.com/watch?v=Za2ezCNvBeU

    Trimming and Flaring

    Cases can stretch with repeated use but with pistol cases I have never found them to stretch excessively. They work harden before that happens. With longer rifle cases the stretching can be greater and affect accuracy. Use your micrometer to check for stretching and either discard or trim cases back to specifications. I have never felt a great need to do this except for some rifle cases. Case trimmers are relatively cheap and easy to use but you can get by without one.

    It is worth the investment to buy a universal flaring die but most die sets have a flaring function. You want to flare the case the least amount possible as it will work harden the mouth of the case and after a few uses the mouth can split upon firing.

    Put a case in the shell holder and pull your press handle all the way down with no die in it. Now screw the die in and keep screwing until you feel very slight resistance. Turn the die in ¼ to ½ more turn but not so much that it starts moving the press handle. Take the case out and try to put a bullet in the mouth of the case with your fingers. If the base of the bullet clears the mouth of the case you are good. Lock the die in place with the lock ring and run all of your cases through that die. If not then screw the die in ¼ turns and put the case back in the die. Continue doing this until the base of the bullet fits into the mouth without catching on the edge of it. This allows you to seat bullets without crushing the edges of the case mouth.

    Charging the cases

    Obviously charging the case with gunpowder is the most critical step in the process. Great care must be taken.

    I am going to hit the high points here and I will write an article later on just gunpowder. It is a subject with a lot of information and I don’t want anyone lapsing into a coma while trying to slog through it.

    Gunpowder does not explode. It burns. Under confinement it burns rapidly. If you pour a little powder out on a safe surface and ignite it will make a sputtering flame for a few seconds. Under pressure or in confinement it burns much more rapidly. Ideally we want the powder to finish burning just as the bullet leaves the muzzle. We don’t want it to finish burning before the bullet leaves the muzzle because that means pressure is dropping and the bullet slowing before it leaves the gun. If it doesn’t finish burning until after the bullet leaves we end up with a lot of muzzle flash and wasted powder.

    Powders come in three types: ball, tube and flake. The powder burns on the surface so by changing the surface area/volume the rate of burn can be controlled. Obviously the ball powders are the slowest burners as a sphere has the lowest surface area/volume possible. Their burning rate is adjusted by changing the sizes of the spheres. Next are the tube powders. These grains are tiny tubes and these offer the greatest variability. They have different outside diameters, inside diameters and lengths. The fastest powders, used in shotguns and pistols, are the flake powders. These are tiny little sheets that have the greatest surface area/volume.

    Each of these offers different advantages. Ball powders can be measured very accurately because there is little variability in the number of balls that can fit in your measure. Tube powders measure reasonably well but as I have mentioned before the mechanics of your powder dispenser may chop some of the tubes changing the burning rate of some of the grains. This variability is small enough that the normal shooter wont notice but long range bench rest shooters generally use methods of measure that don’t damage the grains such as powder tricklers that measure powder by weight instead of volume. Flake powders are the most difficult to measure accurately but since they are used in pistol and shotgun (short range) this doesn’t present much of a problem.

    If you are measuring powder with a dipper… pour about a half of a pound of powder into a glass bowl that does not have corners inside. When scooping the powder with the dipper you want to start at one side of the bowl and make a sweeping motion from one side of the bowl along the inside surface all the way to the other side keeping contact with the bowl the whole time. Try to scoop using the same motion and speed each time. Set your scale for the desired amount of powder and then measure about five consecutive scoops and see how consistent the amounts are and how close they are to your desired amount. If a scoop comes up heaping with powder put it back in the bowl. Don’t try to adjust a scoop by leveling powder off of the top or adding to it. Consistent motion equals consistent measure. If you let the amount of the powder in the bowl get too low it will start scooping differently so keep the amount of powder in the bowl consistent.

    With powder dispensers put about half of a pound of powder in the hopper. Set the can of powder with the lid on it near the powder dispenser. Make sure it is the only can of powder on the table. Do not move that can until you are finished dispensing and you have poured the hopper back into the can.

    I say again: SET THE CAN OF POWDER NEAR THE DISPENSER, MAKE SURE IT IS THE ONLY CAN ON THE TABLE AND DO NOT PUT THAT CAN AWAY UNTIL ALL OF THE EXTRA POWDER IS BACK IN THE CAN. This way if you take a break or leave powder in the hopper for next time you will always know exactly what powder is in the hopper. If you fail to do this never try to remember or guess which powder is in the hopper. You will have to dispose of it. I know someone who did this. He guessed it was Unique powder, it turned out to be Bullseye, a much faster powder. He blew his gun up and escaped injury by the skin of his teeth.

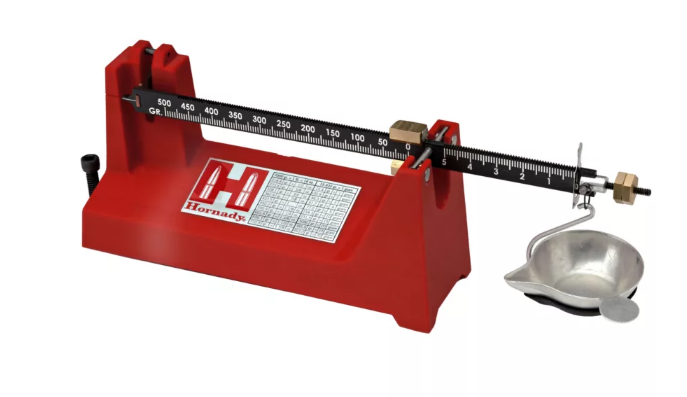
    Set your scale for the desired amount. Set your dispenser over the amount you are aiming for. Dispense one charge and weight it. Adjust your dispenser down and weight again. Keep doing this until you hit the target load. Firmly set the charger adjustment with the lock ring or set screw. Now dispense about five charges and weigh each one. If it consistently hits within one to two tenths of a grain of the target load you are ready to go.

    Charge each case and set them in the loading block as you go.

    When you are finished all of the cases in the loading block will be standing close together and upright. As with the dipper method try to keep your hopper filled consistently. Don’t run it dry or near the end it will measure differently.

    STAND UP AND LOOK DIRECTLY DOWN INTO THE MOUTHS OF ALL OF THE CASES. USE A FLASHLIGHT AND SHINE IT DOWN SO THAT YOU CAN CLEARLY SEE ALL OF THE POWDER IN THE CASES. If one of the cases didn’t charge, got double charged or has more than the slightest variation in charge it will jump right out at you. You will see it easily. Pour that charge back into the hopper and recharge it.

    Now randomly choose three to five charges from one end of the loading block to the other and weigh them. Pour the weighed charges back into the hopper and recharge the cases. Check again with the flashlight.

    You are now ready to start seating bullets.

    *A revolver round that does not get charged is very dangerous. The power of the primer is enough to push the bullet partway down the barrel. If you are firing rapidly it is possible that you may fire another round while that bullet is lodged in the barrel. This will result in a catastrophic failure of your gun and likely serious injury or death for you. In a semi-auto of course the gun wont feed and you will know something is seriously wrong.

    Use the flashlight method when charging. Make safety your religion.

    Seating Bullets

    While your cases are still in the loading block use your fingers to press a bullet base down firmly and as straight as you can into each case. Because the cases are flared this should be an easy and quick operation. The bullets should stick enough that they don’t wobble around and fall out when you handle the cases. Be careful not to jostle things around or powder could splash from one case to another – firm flat surface and press straight down. Any jostling or spilled powder and you must dump them all out and start the charging process over.

    The seating die will both seat the bullet and crimp the case around it. Adjusting both of its functions can be a difficult puzzle so I will give you the key.

    1. Put one of the cases with a bullet in the mouth into the press with no die and pull the handle all the way down.
    2. On the top of the die unscrew the seating adjustment most of the way out.
    3. Screw the die in the press until it goes down most of the way over the case but you still feel no resistance.
    4. On the top of the die screw the seating adjustment down until you feel it contact the bullet.
    5. Pull the press handle up a bit and then screw the seating adjustment down 4 or 5 turns.
    6. Pull the press handle down all the way. You will feel it begin to press the bullet into the case.
    7. Raise the press handle again and see how far you pressed the bullet in.
    8. Repeat this process several times and use your micrometer if you need to to measure the loaded round until it is at proper seating depth. If your bullet has a cannelure or a crimp groove this is easy to do by eye. The bullet should be seated to the proper depth but you can still see the case mouth flared around the bullet.
    9. Unscrew the seating adjustment most of the way out then pull the press handle all the way down.
    10. Screw the die down until you feel resistance. That resistance is the crimping ring inside the die contacting the case.
    11. Move the press handle up a bit and screw the die in ¼ to ½ turn and then press the case back into it. Then examine the case. Continue this until you observer a firm crimp around the bullet but not enough to crush it.
    12. You are now at proper crimping depth but the seating adjustment is not contacting the bullet. Lock the die in place using it’s lock ring.
    13. With the cartridge still in the die screw the seating adjustment down until you feel it contact the bullet. Make sure it is screwed down firmly and then using it’s lock ring lock it in place.

    Your die is now properly adjusted and you can go to town. Run all of the cases through the die examining each as it comes out. Congratulations! you have just loaded a batch of safe, reliable ammunition at a small fraction of the cost of off of the shelf centerfire ammunition.

    *Gunpowder burn rate is strongly affected by amount of confinement. If you seat the bullets too deeply it will cause the powder to burn more quickly, raising pressure. Get yourself one of these: https://www.midwayusa.com/product/685703/rcbs-powr-pull-impact-bullet-puller-kit

    Occasionally while adjusting your seating die you may over-seat one and need to remove it. That little gem will take it back out for you without damaging the bullet.

    *When you are loading if you become tired, stop. You must be attentive and focused throughout the process. Don’t push it. This is not an emergency and the stuff wont run away. It will be there when you are rested and ready to load again.

    Next up: components

    If you are still awake, jump into the comments.

    Bonus: Hatcher’s Notebook is hands down the best technical book on ballistics ever written. It is in the public domain and you can download it as a free .pdf from Glibs, or acquire it in other formats here.

  • Choosing A Load – Reloading, Part 4

    Read the series

    This article is for informational purposes only. Suthenboy is not a credentialed expert. Do not attempt any of these activities without first consulting an expert or a manual published by accredited experts or manufacturers.

    Before beginning your reloading operation you need to choose a load. A lot of factors go into this choice. What do you intend to do with this load? Are you hunting and if you are what kind of game? Are you target shooting or plinking? How much recoil can you tolerate? Are these self-defense loads?

    First I would like to discuss self-defense loads because it is the most important to consider. There are a lot of bullets out there that are advertised as having near magical qualities. Forget them. It is all marketing and if you fall for it and ever have to use them in earnest you can land yourself in hot water. You may have to defend yourself against serious felony charges and it is a certainty that the prosecutors are going to say that you chose bullets that have multiple projectiles or super claws or extra expanding hollow points because you were itching to smoke someone. I repeat, it is a certainty. You want to have the most generic, least scary looking ammo possible. Rest assured that this ammo is just as effective as kewpie doll bullets. A simple hard cast, lead bullet with a flat nose designed for shooting paper targets is more than adequate. Don’t load them up too hot – pick a mid-range load. In a .357 Magnum or a .38 Special a 158 grain semi-wadcutter travelling from 800 to 1000 feet per second will do what you need it to do very effectively and no one can accuse you of being a vigilante wannabe. In 45ACP a 230 grain round nose at 800 fps is just as effective as Golden Swords or Blue Talons at 1000 fps.

    Another good tip: Don’t use ball powders, use flake powders for defense loads. Ball powders burn slower and hotter and tend to create large, blinding fireballs at night, especially in short barreled guns. Flake powders can be tuned to create no or nearly no flash at all. If you have to defend yourself at night you don’t want to be blinded on the first shot.

    With that unpleasantness behind us we can move on to more interesting discussion: hunting. Do you intend to harvest deer? In heavy brush or at long distance over open ground? Deer don’t require high energy bullets but heavy brush is easier to defeat with heavy bullets . This would usually be at short range so any heavy, flat nosed, hard bullet would be a good choice even if it has a flat base. Long ranges are easier to cover with boat tail bullets and the heavier the bullet the more velocity it will retain at range. Hogs are considerably tougher than deer and I recommend as much energy as you can get your hands on. Heavy, fast bullets are preferred but don’t go crazy and make something that is going to hit you as hard as it hits the hogs…keep recoil in mind. For larger animals you want deep penetration which means harder bullets that don’t expand rapidly and dump all of their energy before they hit the vitals.

    For plinking light loads and light bullets are fun because they don’t wear you out with recoil and blast. Go light. You can shoot them all day.

    Always choose loads from reputable publications. All of the manufacturers publish them and they can be found in reloading sections of stores or online. Never try to cook up a load from scratch on your own and never, ever mix powders or use powders or bullets not recommended by the loading manual. Powder manufacturers test their powders in special guns designed to measure pressures safely and you can easily find published starting and maximum loads so there is no point in taking chances. Always stay inside those parameters and work up towards the maximum loads with great caution. My favorite source for loads is www.loaddata.com. I have subscribed to them for years. They are not expensive and I have never had a load that didn’t perform as advertised.

    When making your chosen load make only one and test it. You don’t want to have to dissemble a large number of loads that are unsafe. Watch for signs of pressure as you test each change in the load. Then work up one half grain at a time until you reach your target load.

    Signs of pressure

    1. Flattened primers. The exposed part of the primer has a beveled edge. When the pressure gets high enough to start flattening that bevel out you are getting into the danger zone.
    2. Split cases or bulged cases. This should be self explanatory. In an a semi-automatic if the load is too hot it can move the slide or bolt back before all of the pressure is released resulting in a bulge, usually on one side of the case near the base. You are way into the danger zone. Split cases could be the result of work hardened brass that you need to replace or it could be a load that is hot enough to expand the brass too quickly. Splitting on the side of the case is more of a danger sign than a split mouth. The split mouth is more likely work hardened brass that has been loaded too many times. Replace it.
    3. Soot around the outside of the case. If you find an excess of soot around the outside of the mouth or down the side of the case your pressure is too low. The case is not expanding enough to seal the chamber.

    Interesting historical note and excellent tip

    Always make sure the case is at least half filled with powder. Once upon a time you could buy very light loads intended for small game in large, powerful calibers. You are out deer hunting and see a cottontail rabbit or a squirrel? Simply pop one of these load in and bag it. They were made with round balls instead of cylindrical bullets and used very light powder loads. Occasionally one of those loads would blow a gun to pieces and injure people. How could a light load do that? It took a lot of experimentation and quality checks before they figured out what was going on. You can no longer buy them but there are people out there unaware of why it happens and are wildcatting their own loads. Never do this. What happens is called SEE or Secondary Explosion Effect. It is how Primacord works. When you lay the rifle down on your target there is a small chance that the light powder load can string itself out in the lower part of the case. If the primer ignites the powder string at both ends it will burn from both ends towards the center. When those two pressure waves meet they can be additive and create enormous pressure, enough to blow the gun apart. It is difficult to duplicate but it can happen so don’t take the chance.

    One more tip: The rifling in gun barrels comes in different speeds of twist. It is designated with two numbers such as 1:9. This means one rotation of the bullet in 9 inches. The longer a bullet is the faster it has to rotate to stabilize. If it does not stabilize it will begin to tumble. This completely destroys accuracy and the effectivness of the bullet. You may find loads for your caliber using bullets that your particular gun is not designed to shoot. They are safe if you find them in a manufacturers publication but they are useless. If you find keyhole shaped or oval shaped holes in your target or cant find any holes at all you have chosen a bullet that is too long in relation to its diameter for your gun. Choose a lighter/shorter bullet.

    Next time we will go through the steps for reloading from spent brass to loaded ammunition.

  • Good Reads For Gun Folks

    In my forty-odd years of being a shooting sports aficionado, I’ve learned that like me, most gun nuts like reading about guns and shooting sports almost as much as they like the sports themselves.  The explosion of the Information Revolution has resulted in a plethora of scribes talking about guns and shooting, but back in the old days of paper and ink, the market was a lot tighter.

    Nevertheless, the shooting scene saw some great gun scribes from a variety of backgrounds.  We had cops and cowboys, hunters and target shooters, and some of them were prolific writers.  Like must gun cranks, I had my favorites.

    So here they are, in some sort of particular order.

    Jack O’Connor (1902-1978)

    Jack O’Connor with a mountain sheep.

    Jack O’Connor was probably the Dean of American gun writers.  One of my favorite bits of his work was an article for Outdoor Life titled “Moose Are Too Big,” in which he described being on an Alaskan trip when he was asked to help find and kill a moose for camp meat.  The story revolved not around the hunt but the ordeal of dressing, quartering, boning and packing out hundreds of pounds of moose meat, about which O’Connor expressed a preference for birds: “You can shoot a quail, put it in your pocket and go find another.”

    O’Connor did nevertheless spend much of his career hunting big game.  He was an early advocate for the .270 Winchester cartridge for game up to and including elk, emphasizing the importance of marksmanship and shot placement over raw power.  (Not that you can’t have both.)

    O’Connor’s books include:

    • Game in the Desert
    • Hunting in the Rockies
    • Sporting Guns
    • The Rifle Book
    • Hunting with a Binocular
    • Sportsman’s Arms and Ammunition Manual
    • The Big-Game Rifle
    • Jack O’Connor’s Gun Book
    • The Outdoor Life Shooting Book
    • The Complete Book of Rifles and Shotguns
    • The Big Game Animals of North America
    • Jack O’Connor’s Big Game Hunts
    • The Shotgun Book
    • The Art of Hunting Big Game in North America
    • Horse and Buggy West: A Boyhood on the Last Frontier
    • The Complete Book of Shooting
    • The Hunting Rifle
    • Rifle and Shotgun Shooting Basics
    • Sheep and Sheep Hunting
    • Game in the Desert Revisited
    • The Best of Jack O’Connor
    • The Hunter’s Shooting Guide
    • Hunting Big Game
    • The Last Book: Confessions of an Outdoor Gun Editor
    • Hunting on Three Continents with Jack O’Connor

    Elmer Keith (1899-1984)

    Keith’s autobiography, a crackin’ good read.

    Elmer Keith was a prolific gun writer; his book Sixguns is a personal favorite of mine, having survived the test of time to still be one of the best all-around books on revolvers and revolver shooting available.  His biggest claim to fame in the shooting world is probably his role in the creation of the .44 Magnum cartridge, which was based on heavy .44 Special loads he devised for the N-frame Smith & Wesson revolvers.  He was a fan of the Smith & Wesson Triple Lock, calling it the “finest revolver ever devised,” and Keith was an early convert to Bill Ruger’s placing modern lockwork and sights on the classic American single-actions, resulting in the now-classic Ruger Blackhawk.  On hunting rifles, he was a staunch advocate of big guns; he co-developed the .333 OKH wildcat and was an early proponent of the .338 Winchester Magnum.

    Funny thing; Jack O’Connor and big-gun advocate Elmer Keith were contemporaries in the American shooting scene, but they held differing views on hunting rifles and sidearms and cordially (and sometimes not-so-cordially) detested each other for many years.

    Keith’s books include:

    • Sixgun Cartridges and Loads
    • Big Game Rifles and Cartridges
    • Keith’s Rifles for Larger Game
    • Elmer Keith’s Big Game Hunting
    • Shotguns
    • Sixguns
    • Guns and Ammo for Hunting Big Game, with John Lachuk.
    • Safari
    • Keith, An Autobiography
    • Hell, I Was There (autobiography)

    Townsend Whelen (1877-1961)

    Whelen’s “On Your Own in the Wilderness.”

    (Army) Colonel Whelen is best known for his experiments on wildcat rounds based on the then-standard military-issue rifle cartridge, the Caliber .30, Model of 1906.  The .35 Whelen was accorded legitimacy by Remington some years back, but his other efforts, including the .25 Whelen, .375 Whelen and the .400 Whelen never gained much traction, although the .25-06 wildcat that became the .25-06 Remington was very similar to the .25 Whelen.

    While Colonel Whelen wrote several books, my favorite of his works appeared in Outdoor Life around 1910 and described a several-months adventure he embarked on with a friend, a saddle horse and pack horse each, a rifle each, plenty of ammo and his buddy’s dog.  Red-Letter Days in British Columbia is a must-read for any outdoor nut.

    Whelen’s books include:

    • Suggestions to Military Riflemen
    • The American Rifle
    • Telescopic Rifle Sights
    • The Hunting Rifle
    • Small Arms and Ballistics
    • Hunting Big Game (of which he was the editor)
    • Amateur Gunsmithing
    • Why Not Load Your Own?

    Col. Charles Askins, Jr (1907-1999)

    Can’t really add much to that title.

    You’ve got to love a guy whose autobiography is entitled Unrepentant Sinner.  (Dammit, he stole my title.)  Askins had two careers, one in the U.S. Army and one in the Border Patrol, and claimed at least 27 men killed in armed combat, which is probably nearly a record in the 20th century.  So, when it comes to the deployment of a sidearm in combat, he knew of whence he wrote.  He was something of an unsavory character, claiming at one point in his later years that he hunted game because he was no longer allowed to hunt men, but his survival in some nasty environments speaks volumes of his skills with a firearm.

    Askins’ books include:

    • Hitting the Bull’s-Eye
    • The Art of Handgun Shooting
    • Wing and Trap Shooting
    • The Pistol Shooter’s Book
    • Unrepentant Sinner: The Autobiography of Col. Charles Askins
    • The Gunfighters: True Tales of Outlaws, Lawmen, and Indians on the Texas Frontier
    • Shotgun-ology: A Handbook of Useful Shotgun Information
    • The African Hunt
    • Asian jungle, African Bush
    • The Shotgunner’s Book – A Modern Encyclopedia
    • Texans, Guns & History
    • The Federalist

    Bill Jordan (1911-1977)

    Bill Jordan demonstrating the quick draw.

    Bill Jordan’s book on handgun combat, No Second Place Winner, was the result of his long career as a lawman.  He was also a Marine, with service in WW2 and Korea, leaving the Corps with the rank of Colonel.

    Jordan was a lawman back when lawmen was not the visored, armored paramilitary forces we see in our cities today; his armor was a shirt, his only recourse against bad guys was a holstered revolver and cuffs.  He was a master with the double-action revolver, once having been recorded drawing, firing and hitting his target in .28 seconds – and he instructed James Arness in fast-draw techniques for Arness’ role as Marshall Dillon in Gunsmoke.  Jordan’s thoughts on guns in general and combat handguns in particular are still worth reading.

    Jordan’s books include:

    • No Second Place Winner
    • Mostly Huntin’
    • Tales of the Rio Grande

    Warren Page (1910-1977)

    While the saying “only accurate rifles are interesting” is bandied about a lot and is frequently named a quote from Townsend Whelen, it’s originally attributed to Warren Page, and few have done as much to spread the cause of accurate rifles than he did.

    Gun Greats: Norm Williams, Bill Ruger, Warren Page, Joyce Hornady and Clyde Willey.

    Page was responsible for the greatest name ever for a wildcat rifle cartridge; he took the old .244 Remington case and blew it out to a 28-degree shoulder and called it the .240 Page Souper Pooper.  It was a good round, largely eclipsed now in wildcatting circles by the .243 Improved.

    Page’s books include:

    • The Accurate Rifle
    • One Man’s Wilderness

    Col. Jeff Cooper (1920-2006)

    The Browning/Colt 1911 pistol never had a more ardent advocate than Jeff Cooper.  A retired Marine, Cooper also promoted the use of the rifle, stating in his book The Art of the Rifle, “…the rifle itself has no moral stature, since it has no will of its own. Naturally, it may be used by evil men for evil purposes, but there are more good men than evil, and while the latter cannot be persuaded to the path of righteousness by propaganda, they can certainly be corrected by good men with rifles.”  That’s a good point lost on all too many folks today, but Colonel Cooper was a man of a simpler time.

    Colonel Cooper also coined the term hoplophobia, meaning to have an irrational fear of gadgetry – especially weapons.

    Colonel Cooper making a couple of points.

    Cooper’s books include:

    • Principles of Personal Defense
    • Another Country: Personal Adventures of the Twentieth Century
    • C Stories
    • Fire Works
    • Shotluck
    • To Ride, Shoot Straight, and Speak the Truth
    • The Art of the Rifle
    • The Modern Technique of the Pistol
    • Yukon Journal
    • A Man in Full
    • Cooper on Handguns
    • Handguns Afield
    • Guns of the Old West
    • Fighting Handguns
    • Custom Rifles

    Honorable Mention:  Denis McLoughlin (1918-2002)

    Denis McLoughlin was not, strictly speaking, a gun writer.  But if you’re interested in the Old West, his book Wild & Woolly – An Encyclopedia of the Old West is an essential reference.  Ever wondered what Valley Tan was and where it originated?  Heard of the Dog Soldiers but weren’t sure who they were?  Don’t know who Annie Moses, Martha Jane Cannary, Alfred Swartz or Melvin King were?  Wild & Wooly will tell you.  Ever wondered where the Llano Estacado, Inscription Rock or the Mormon Trail were?  Ah, but Denis McLoughlin has the answer!  Funny thing is, he was a Brit.

    Reading about guns isn’t as much fun as shooting them.  But imagine the ammo costs if you spent as much time shooting as you can be reading.  Take a browse through any of the authors listed here; you won’t be disappointed.  Read, and enjoy!

  • Dies – Reloading, Part 3

    Read: Part 1; Part 2

    This article is for informational purposes only. Suthenboy is not a credentialed expert. Do not attempt any of these activities without first consulting an expert or a manual published by accredited experts or manufacturers.

    Last time I hit the high points of beginning reloading and briefly discussed the different style of presses and other equipment. The presses are useless without dies specific to the cartridge that you intend to reload. Let’s talk about dies.

    There are two basic style cartridges: straight walled cases and cases with shoulders on them. Because of the different shape, properties of brass and steel we end up with two different kinds of dies: tool steel and carbide steel.

    Carbide steel is extremely hard making it prohibitively expensive to machine a cavity in the die to fit shouldered cases. You can get such a critter but when you see the price tag you will be purchasing tool steel dies. Because tool steel is not nearly as hard and kind of rubbery lubrication is requied to avoid having a brass case stick inside the die. These can be very difficult to remove and the die may be damaged in the process. This adds two extra steps to the reloading process: lubrication and subsequent cleaning of the cases.

    Dies for straight walled cases are usually fitted with a carbide steel liner. Because they are so hard and highly polished straight walled brass cases do not stick and slide right out with a polished surface. This greatly adds to the convinience of sizing spent cases back to size specifications. Always get carbide dies for straight walled cases.

    Of the manufacturers I prefer Lee Precision dies. Dies are full length threaded on the outside in 7/8×14 so that it screws into the press. This is pretty universal. There is a lock ring that rides on the outside of the die to set it firmly in the press. Lee is the only manufacturer that uses an easily replacable rubber O-ring to tension that lock ring. The other manufacturers use a set screw in the lock ring. That tiny set screw can become frozen and difficult to remove. It also sets against the 7/8×14 threads on the outside of the die and can damage them. Also, Lee dies are of high quality, low cost and combine several operations in single dies. Because some people prefer other brand dies but want the Lee style lock ring Lee will happily sell you as many of their lock rings as you wish to buy.

    All of the manufacturers produce high quality dies and I own at least one set from all of them. There is one more type of die worth noting. These are high-precision dies aimed at the long range rifle shooter. These allow for more precise sizing and seating of bullets, something we will discuss in a later article. The stand-outs are the Redding and Forster dies.

    If you are getting into benchrest shooting you would definitely want to shell out the bucks for some of these. I don’t have any because the dies I already have make ammunition that is more accurate than I can shoot anyway.

    This is a highly technical, tedious subject that is impossible to write about with inspiration. I will try to include as many tips and tricks I have learned over the years that you can’t find in any book so that those who intend to start reloading will be saved the time and trouble of learning on their own. I hope there are enough gun nerds around here that some will slog their way through and any other reloaders out there please add your tips in the comments.

  • Other Necessary Equipment – Reloading, Part 2

    Read Part 1

    This article is for informational purposes only. Suthenboy is not a credentialed expert. Do not attempt any of these activities without first consulting an expert or a manual published by accredited experts or manufacturers.

    The press is the heart of the reloading set but the beginning reloader will also need a good scale, a powder charger, a micrometer and a priming tool.

    Scales can be analog or digital but they must be calibrated in grains. The grain is an ancient unit of measure that originally meant the weight of one grain of wheat. Today it is defined as 1/7000 of a pound. As far as I know, the only people to use that measure any are in the firearms industry. My scale is a Hornady analog scale and is accurate to 1/10 of a grain. It cannot malfunction as it is a balance beam scale.

    There are also digital scales and powder dispensers with built in digital scales. I have never tried these but a lot of reloaders swear by them.

    A good micrometer can be had for a few bucks at any tool store. I recommend the dial type rather than the digital ones as they are easy to use and last much longer than battery powered micrometers. I also recommend one calibrated for inches as most calibers are measured in inches. Conversions are simple for metric calibers.

    Priming tools are another matter. There are many on the market and many presses have a priming function built in. It is important that primers be seated just below the base of the case and a good priming tool will do that in addition to allowing you to seat primers rapidly and accurately. You don’t want a tool that can mash a primer so hard that it ignites. After Lee precision changed the design of their hand tool it worked less smoothly so I switched to an RCBS which works fine for me but I am thinking of switching again to a Forster bench mounted priming tool. It is specially designed to seat primers very accurately without danger of ignition. It uses a tube style hopper instead of the pan style, which I like because it is easy to turn all of the primers correctly in a pan and then peck them up with the tube. Shell holders are not required and the bench mounted tool is easier on your hands.

    Powder dispensers can be fairly simple affairs or very complicated. I like simple. The old style has a hopper on top that feeds into a cavity drilled in a rotating block. The cavity has a piston style floor that can be moved into the cavity at various depths to adjust the amount of powder that can enter the cavity. When the handle is in the down position the cavity opening faces up and the hopper fills it. When you turn the handle down the rotating block turns and the cavity faces down, emptying through a small spout directly into the case which you hold under the dispenser in contact. The problem with these is that as the cavity opening passes away from the hopper on its way to the spout it can chop grains of gunpowder. This can change the weight of the charge slightly and also causes the gunpowder to burn at a different rate. It doesn’t really create danger but it does affect accuracy. This is a bigger problem with tube powders than flake or ball which means rifle powders where accuracy is more of an issue. A simple solution is to empty the case back into the hopper if you feel an especially hard chop as you move the handle. A better fix is the Lee Precision charger which is designed to not chop any powder grains.

    The automatic dispensers are much more complicated but easy to use. I have never used one, but I get good reports from the users.

    A couple of other tips:

    Your bench should be sturdy and large enough to mount your equipment on but not so large that clutter accumulates on it. Space has a tendency to fill up. If your bench is not too large it will be easier to keep clean and organized.

    A loading block is a cheap accessory that holds your cases in between loading steps so that they don’t get knocked over. It helps keep the process organized and you can keep a better eye on everything. You can get one for just a couple of bucks. Get one.

    A primer tray is another very cheap, very useful item. It is a small plastic tray with tiny ridges in it. Primers are placed in it and it can then be lightly shaken back and forth. As the primers slide around in it the open edges of the primers catch on those ridges and the primers flip to face all in the same direction. They can then be more easily loaded into the priming tool hopper.

    Clean cases are easier to work with and function better in firearms. You don’t have to clean your cases after every firing but after every second or third loading is a good idea. Most hardware stores sell vibrators for cleaning tool parts and the reloading suppliers sell them. Pick up a vibrator and some crushed walnut shell so you can keep your brass clean. These also help reduce corrosion if you store loaded ammo for long periods of time. Always use the vibrator on empty brass, never on loaded cartridges. Vibrating loaded ammo will damage the powder grains which will greatly increase its burning speed creating dangerous pressures.

    If the Lords of the Glibs keep publishing these next time we will go through dies and toss in more tips and tricks.

  • Can anyone help solve a puzzle?


    Animal’s leather article reminded me about something I’ve been wanting to ask the expert Glibs for some time. I am custodian of a family heirloom, a Colt .45 Single Action Army revolver that belonged to my great-grandfather. I also have the original flap holster which has an elaborate embossing that I can’t make out.

    I scanned the embossing which looks to me like:

    Left side: “I” or “J”.

    Middle: “S” intertwined with a “G” or “Q”.

    Right side: “C” and little “o”. Perhaps “Co.”?

    All over a flattened “8” with a bow on the left side.

    My great-grandfather lived in the Chicago, Illinois area so the “I” may stand for “Illinois”.

    Does anyone here recognize the embossing?

  • Gun Leather For The Well-Equipped Six-Gunner

    Gun Leather

    Let’s talk about gunbelts and holsters for outdoor work.  No concealed-carry stuff here – let’s discuss rigs for carrying a heavy, powerful belt gun for serious outdoor business.

    But before we do that, let’s talk about guns and loads.

    Western drop holster with N-Frame Smith

    Woods-Bumming Guns

    While I favor my Glock 36 for everyday concealed carry, for outdoor work I like a big-bore wheelgun.  When woods-bumming, I usually have either my S&W 25-5 or my Ruger Vaquero, both in .45 Colt.  If I take it in my head to carry a semi-auto, it’s either the 1911 or the Glock 21, both (obviously) .45 ACPs.  In the revolvers I like 8 grains of Unique behind a Lasercast 250-grain hard-cast flat point.  That load will blow through a railroad tie and knock a big handful of splinters out the far side and will easily lengthwise a big mulie or a cow elk.

    For the .45 ACP I like the 200 grain Lasercast semi-wadcutter.  Like most Glocks, my 21 will feed almost anything; the 1911 is a little fussier but will feed SWCs fine with a good magazine.  I use Kimber magazines, and the 1911 will feed empty cases with those.

    Now, your mileage may vary; almost all my woods-bumming these days is done in the Rockies in Colorado and Wyoming, where there are several species of big, thick-skinned, toothy critters in residence, so I recommend a major-caliber handgun for hereabouts.  But if you’re outdoors in areas where the most likely targets for your sidearm are coyote-sized, anything from a .32 Long to a .38 Special will work as well, along with being a little easier to shoot.  The Ruger Single-Six is available in .32 H&R Mag, a fine revolver in a good round for medium-sized varmints and, with a mild load topped with a hard-cast lead pill, nice for whatever edible small game presents itself.

    Advantage of a drop belt rig: Fast into action.

    But, let’s move on to what I really wanted to talk about, and that’s how to tote your belt iron.

    Gun Belt Rigs

    The gun belt and holster should be comfortable and solid.  Choice of material is up to the shooter; some like nylon web belts and holsters, and there is certainly nothing wrong with such a rig; I’ve used many myself.  But it’s hard to beat good leather.  Heavy harness leather should be used in the belt, and good stout bull hide in the holster.  A heavy leather rig will start out very stiff, but wear and the application of a softening oil, like neat’s-foot oil, will soon make the rig softer and more wearable.

    A simple cartridge belt with the Vaquero in a Mexican loop holster.

    (Disclosure:  I am in no way connected to nor do I have any financial interest in the companies mentioned, I just like their products.)

    For my belt guns, I like (in fact, it’s my favorite rig) the America’s Gun Store #110 Wyoming Drop belt with the #114 Cheyenne holster, which rig hangs the butt of the gun at about wrist height when your arms are hanging naturally.  I find this near perfect for being able to get the gun into action quickly; if you use the leg tie down to hold the holster in place, you can wipe off the holster’s hammer loop with the shooting hand’s thumb just as your fingers wrap around the grip.

    Train yourself to keep your finger off the trigger while drawing; cock the single-action or start the double-action pull after you have cleared leather and are already pushing the muzzle of the piece towards the target.  I try to get in some reflex shooting practice every year, but draw and dry-fire won’t always work; most folks tend to shoot high when shooting instinctively.  Practice!

    The Wyoming Drop Belt also comes in a two-gun version if dual six-guns are your thing, and a cross draw holster is available for the one-gun version as well.  Personally, I don’t much see the point in carrying two revolvers; if you’re that concerned about running into some kind of trouble, best to pack along a rifle.

    Lots of folks like the Threepersons holster as well, and the same statements apply.  For that matter, there is nothing wrong with a simple leather cartridge belt like the Hunter Company Straight Cartridge Belt outfitted with the classic Mexican loop holster, like the one I tend to tote my Vaquero around in.

    Trouser Belt Holsters

    Full-size 1911 in Bianchi leather
    A flap holster is good for keeping the elements off your belt iron.

    There are options for folks who aren’t into dedicated gunbelts as well.  When talking belt holsters, I’m tempted to just mention Bianchi and let it go at that, but there are plenty of good holsters our there, ranging from Uncle Mike’s vinyl to high-end leather, prices from $25 or so to, well, as high as you care to go.

    Find a holster that holds the piece canted at the right angle for your natural grip and your gun hand and carry it in a position that’s comfortable for your build; I tend to favor a right-hand hip carry.  I’ve used a cross draw belt holster a time or two but don’t much care for them, as I find it awkward to reach across with my shooting hand.  Your mileage may vary; as noted above, continue your draw-dry fire practice until you find the holster position that allows you to bring your piece into action quickly with a minimum of extraneous movement.

    Bad Weather

    If your stomping grounds tend to be wet and snowy/rainy, like the Pacific Northwest or Alaska, Great America’s also makes their very nice K #17 flap holster, which keeps weather off the gun but makes it take longer to bring the piece to bear.  Bianchi makes a mil-spec flap holster for various automatics if more modern hardware is your thing.

    Whichever rig you choose, keep it clean and softened (saddle soap and water for leather rigs, good cleaning with clear water and a little clear soap for synthetics) and it will give many, many years of solid service.  A well-made firearm can last for a couple of generations if it’s well cared for; there’s no reason the carry rig shouldn’t last as long.

  • Beginning Reloading

    Read the series

     
    This article is for informational purposes only. Suthenboy is not a credentialed expert. Do not attempt any of these activities without first consulting an expert or a manual published by accredited experts or manufacturers.


    I developed a passion for shooting and hunting at an early age. I suppose my Grandfather’s and Father’s love of firearms rubbed off on me. Shooting for me was what golf is to others. It is an activity that requires discipline, an activity where focus and precision pays off. I constantly competed against myself always trying to improve and over time with effort the improvement was very evident to me. Like most the majority of my shooting was done with 22 Long Rifle because of economy. When I was about 14 years old my father gave me a wonderful Christmas gift – a Lee Precision handloading set and a Ruger No.3 rifle chambered in 22 Hornet. Suddenly I could shoot center fire for less than the price of 22 Long Rifle.

    Since that Christmas, I have reloaded hundreds of thousands of rounds, maybe approaching a million and a half, in every caliber you can imagine, save the new-fangled rounds that have come out in recent years. Yes, I said it. Get the hell off of my lawn.

    Since those days our economy has expanded dramatically, the cost of reloading components has risen and the cost of bulk ammunition in common calibers has fallen. For plinking ammo reloading is not as economical as it used to be but reloading still has an important place. Uncommon calibers can be exorbitantly expensive and difficult to find. Precision rifle shooters cannot obtain the quality of ammunition their sport demands off the shelf. For people like me, reloading is a very enjoyable hobby and an end in itself. With experience one can acquire one heck of an education about the sport, and with a small stock of components and tools never lack for ammo in a pinch.

    Many people, like me, got their introduction to reloading with a Lee Precision handloader kit. It is simple to use and at about forty bucks the smallest outlay of cash to get started making your own ammunition. I haven’t found any distributors for these little gems but you can buy them directly from Lee Precision.

    I am not aware of any other companies that fill that niche but if you want to step up to more sophisticated tools there are many manufacturers. The big names are RCBS, Lee Precision, Redding, Lyman, Hornady, Dillon, Forster and MEC. All of these companies have websites (links above) and are distributed through a large number of suppliers. I am not going to make strong endorsements for any of them because they all make quality products that are better in some ways than the others. Like choosing a firearm the beginning reloader will have to decide by their own personal preferences.

    As for distributors there is a plethora of them. If you prefer shopping in-store Bass Pro and Cabela’s keep a good stock on the shelf. There is also the odd and end small sporting goods stores around. For mail order there are number of large houses for comparison shopping. I find that their prices are very competitive, their stock reliable and their service top-notch. These include Midway USA, Wideners, Brownells, Precision Reloading, Natchez Shooter’s Supply and Cheaper Than Dirt. This is by no means a comprehensive list.

    The first step up from the Lee handloader kit is a single stage press. This press bolts onto a sturdy work bench and holds one die at a time. There are some very high quality single stage presses out there and these happen to be my personal favorite. I can concentrate on one step at a time and pay close attention to every detail. My personal press is a Forster. I consider it of the highest quality. It also has great advantage in convenience as the dies are held in a groove so you don’t spent time screwing them in and readjusting each time you change dies. Additionally it has clamping jaws to hold the cases so no large sets of shell holders are needed.

    Forster co-axial press
    Forster co-axial presses are not cheap but definitely worth every penny for the hard core reloader.

    The next step up from the single stage press are multi-stage presses. These presses hold more than one die at a time and each crank of the handle performs one step of the process on multiple cases as they progress around a turret. Spent brass goes in one end and a fully loaded case comes out with each crank of the handle. Obviously these presses produce loaded ammunition for the high volume shooter.

    The last step up would be motor powered presses. Many of the manual progressive loaders can be accessorized with motors and by now we are talking about high budget equipment. Dillon is commonly considered the top of the line motorized progressive loader and most competitive shooters use them but there are others that work well.

    I have a progressive loader but I prefer to use my single stage press. With the multi-stage press there are too many things going on at once for me to fully pay attention. If you are a novice intending to get into loading your own ammunition I highly recommend starting out with a single stage press. Safety must always come first so take your time. Don’t get in over your head. When you have learned all of the ins and outs of the loading process and all of the things that can go wrong then move up to a multi-stage press.

    Addendum

    A recent study showed that CCL holders are six times less likely to commit crimes than police officers.

    There is a reason for that. These are people who are law abiding by nature and interested in keeping their licenses. I suspect the same is true for reloaders. These people pay attention to detail. They follow the rules. That becomes second nature to them. Safety is a huge concern and they become accustomed to thinking that way. If you program yourself to behave that way reloading can be safe and rewarding. Never forget and become careless or have lax standards. You are dealing with inflammable materials that can develop very high pressures very quickly. Bullets, even travelling at low speed have incredible momentum. They carry more energy than you think even at speeds low enough to see with your eye. A relatively light lead slug travelling at the speed of an airsoft pellet can be deadly. You can lose eyes, fingers, get broken bones or severed arteries. You can receive severe burns. If you have a store of gunpowder in your reloading area, depending on how much, you might want to consider that if your house catches fire you may have to stand in the street and stop the firemen from approaching the structure. Let it blow. Nothing in your house is worth someone losing a life over. I threw all of the candles out of my house years ago. I don’t smoke in my reloading room.

    Safety. Safety. Safety. Always on my mind. In the forty years or so that I have been reloading ammunition I have never had a single failure. Every single cartridge I make is done with great care. I own about a dozen fire extinguishers. Kitchen, living room, Jeep, Honda, bedroom, garage, outside shed, mule, and two extra bedrooms.

    Don’t be that guy. Be Safe. Stuff can be replaced. People can’t be.

  • CODE IS FREE SPEECH

    CODE IS FREE SPEECH

    ZARDOZ SPEAKS TO YOU, HIS CHOSEN ONES. WE HERE AT GLIBERTARIANS ARE FULLY DEVOTED DEFENDERS OF THE RIGHT TO SAY, THINK, WRITE AND PUBLISH ANYTHING WITHOUT GOVERNMENT INTERFERENCE OR PRIOR RESTRAINT. RECENTLY, WE CELEBRATED WHAT WE THOUGHT WAS A BIG WIN FOR THE RIGHT OF FREE SPEECH IN AMERICA. THE FEDERAL GOVERNMENT VOLUNTARILY SETTLED A LAWSUIT WITH DEFENSE DISTRIBUTED AND CODY WILSON, REGARDING THE PUBLICATION OF SPECIFICATIONS FOR MANUFACTURING HANDGUNS ON VARIOUS TYPES OF COMPUTER CONTROLLED MACHINERY AVAILABLE TO THE GENERAL PUBLIC. TODAY, AUGUST 1ST, WAS SUPPOSED TO BE THE DAY THAT ALL OF THESE FILES WERE ONCE AGAIN AVAILABLE TO THE PUBLIC. HOWEVER, VARIOUS STATES AND LOCALITIES HAVE HAD FEDERAL JUDGES ENJOIN THIS BY EMERGENCY ORDER. WE DO NOT SUPPORT ANY SUCH RESTRICTIONS. IT IS THE CASE TODAY THAT PEOPLE PROHIBITED FROM POSSESSING A GUN BREAK THE LAW IN ORDER TO POSSESS A GUN. THEY CAN GO TO YOUTUBE RIGHT NOW AND WATCH “HOW TO” VIDEOS OF PEOPLE BUILDING GUNS WITH A DRILL PRESS, A HAMMER, AND AN ANVIL.

    IN SUPPORT OF DEFENSE DISTRIBUTED’S NOBLE WORK OF EMPOWERING CITIZENS TO BUILD AND POSSESS THE TOOLS TO FIGHT AGAINST UNJUST FORCE, OF ANY TYPE, WE PROUDLY FEATURE THIS LINK TO THE FILES. ZARDOZ BRINGS YOU THE GIFT OF THE GUN! CLICK HERE TO GET THEM FROM AN  END TO END ENCRYPTED SITE.

    THIS ACT IS PART OF THE REASON GLIBERTARIANS WAS CREATED, AND IS STILL HERE.

    ZARDOZ HAS SPOKEN.