I am going to write something controversial. I am fully aware of what I am about to write, is probably going to result in the very least, being pelted with rotten cabbage.
This is my review of Shiner Holiday Cheer.
Not my photo
What is so controversial about this particular beer….I’ll get to that. You see, I don’t particularly care for Shiner or as the brewery is officially know as Spoetzl Brewery. This is awkward coming from somebody that happens to like Bocks. I just don’t think Shiner is that great, to be honest. I will have my AR at the ready while this is active, because this be fighting words. People from Texas just love this stuff.
Spoetzl Brewery to it’s credit does have an interesting history. Like many large breweries it was founded by a German Immigrant:
Kosmos Spoetzl, a German immigrant brewmaster, learned of the Shiner operation and coleased the facility with Oswald Petzold with an option to buy in 1915. Spoetzl had attended brewmaster’s school and apprenticed for three years in Germany and worked for eight years at the Pyramid Brewery in Cairo, Egypt, before moving to San Antonio in search of a better climate for his health. He came, carrying the recipe for a Bavarian beer made by his family from pure malt and hops. Within a year Spoetzl bought the brewery, which he renamed the “Home Brewery,” and began to produce beer in wooden kegs and bottles. After 1916 the beer was packaged in glass returnable bottles; aluminum kegs were first used in 1947, nonreturnable bottles came in 1958, party kegs in 1964, and cans in 1970. When Prohibition was declared in 1918, Spoetzl produced near beer, ice, and, according to some sources, regular beer as well. During this period, he sustained the brewery by doing construction work in Florida with crews and trucks brought from Texas. After his wife’s death in 1921, Spoetzl considered returning to Bavaria but was convinced by his daughter to retain the business. “Miss Celie,” as Cecilie was called, served as business manager of the firm, and her daughter Rose joined the firm in 1964. August Haslbeck, who served as brewmaster, was the son of a noted Bavarian maltmaster and Spoetzl’s nephew. He later returned to Germany to complete an apprenticeship and receive a brewmaster’s degree. With repeal of Prohibition in 1933, the business resumed, with the introduction of “Texas Export,” a new product later known as “Texas Special” beer. Sales were made within a 100-mile radius. Over the next decade the company added a new bottling room and brew house, and in 1947 Spoetzl constructed the white brick Alamo-style plant still in use today.
The first time I had Shiner Bock, it was probably the only one available not made by what was then Anheuser-Busch. It was okay but as I drank more beer, including actual bocks from Germany, I realized there was something missing. I don’t know what it is, but I’ll just focus on the basics.
Is it malty? Yes.
Is it balanced? Yes.
Does it have body? Not really.
The last one I think is where it falls short. While it is carbonated it dissipates so quickly that I feel like I am just drinking flat beer. It’s like opening a beer, telling yourself you will finish it later and putting it back in the fridge. When you get back to it, its just not the same. It is this feeling except I just opened it. Now, many Mexican beers have this same quality, except they aren’t necessarily pretending to be something their not. Then again, Shiner Bock is what it is, take it or leave it. I’ll accept it if offered, but I am not about to buy it.
Not my photo, nor am I participating in this particular parade.
I have had several of their varieties while I was TDY at Sheppard AFB, near Wichita Falls, TX. The liquor store in town had quite the selection of all their varieties and since I was in my 20s and quite frankly stuck in Wichita Falls for a month…I had what is in hindsight, a disturbing amount of beer while getting hotline certified on overhead power lines. One that does stand out in my opinion from Spoetzl is their Czech Pilsner. While it may seem like faint praise, this is actually quite good and should I actually find it in Arizona, I might be inclined to buy it. Unfortunately, I only ever see Shiner Bock.
So how it Holiday Cheer? Same as the rest of them, which is pretty flat. Also it is very fruity, perhaps not in a good way. Last year (yes, I’ve been doing this over a year now)I reviewed a holiday ale that was also fruity but it had significantly more body, and the malt complexity went well with the fruitiness. This one is just sweet, so I slammed it down, and opened an amber ale. Shiner Holiday Cheer: 2.5/5
At this point, you may have two batches of mead, a batch of wine, a batch of cider, and a batch of beer fermenting away in your basement. So, let’s take a step away from making something this week and start going over the main ingredients in beer.
First, what is malt? Malting is a process to soften the outer husk of a grain, and allow access to enzymes that break down starches into sugars. This process has several steps which are:
Germination – The grains are mixed into water in a dark room to begin the germination process.
Kilning – At this point the grain is dried and heated. The heating will change the quality of the grain making different types of malt (we’ll get to those in a bit)
Cleanup – Now they want to break off the little dried out rootlets that have sprouted, test the malt to check the quality and the specs of this batch.
Many grains can be malted (including corn, wheat, rice, and oats), but barley is the main one for beer. Malts can be broken down into a couple of broad families:
Base Malts [Diastatic Malt] – These malts have enough diastatic power (measurement of the amount of enzymes present in the malts) to convert the starches in themselves and a certain amount of other malts. The main ones used in beer are referred to as 2-row and 6-row (based on the structure of the head of barley) with many regional ones being used for specialty beers (Marris Otter – British, Munich – German, Pils – Pilsners). These can add biscuit and bready notes to the beer.
Crystal/Caramel Malts – While the process to make Crystal and Caramel malts is different, the end result is very similar and at the homebrew level the two terms are generally used interchangeable. These are malts that have been roasted and to force the sugars to be modified into a non-fermentable state. These are referred to by their Lovibond rating (this is a measure of the color, the higher the number, the darker). These malts will add body, some caramel notes, some sweetness, and (for the darker ones) some roasted notes.
Specialty Malts – These are used in small amounts for specific characteristics they can impart to the beer. Carapils is a popular one that’s said to increase head retention and body, smoked malts have been smoked and add that flavor, chocolate malt will add chocolate notes, roasted barley is non-malted and will add a dark color and roasted flavors. Technically all Crystal/Caramel malts could be considered specialty malts as well.
A beer recipe will generally have between 50-75% of the grist (crushed malts) made up of base malts, with the rest being crystal/caramel or specialty malts. You can also make a beer with nothing but base malts or just a single base malt. The vast majority of the time, you can also freely swap between base malts (although it will change the flavor) in a recipe, unless it’s using a large amount of specialty malts or adjuncts.
Now that I’ve mentioned adjuncts, I should probably explain them. When talking about an adjunct in the brewing world, you’re referring to anything that isn’t malted barley (or wheat in some cases), hops, water, and yeast. So rice, corn, oats, and rye are all adjuncts, as are Candi syrup, table sugar, or fruit juice. Spices, vegetables, fruits, and herbs also qualify. Do adjuncts make a beer bad? No, forget the Reinheitsgebot. It was passed to protect the income of nobility who were making wheat beers. It sets price controls!
So why use adjuncts? The main reason is for different qualities that the grain and sugar additions can make. You want that creamy mouthfeel of an oatmeal stout? You need to use some oats. Want to make a milk stout? You’ll need to include some lactose (milk sugar). The other is flavor, there’s nothing wrong with a good fruit beer, or a nice spiced porter. According to a couple of books I’ve read, some of the Belgian breweries (if you drink good beer, you’ve probably had their stuff) use flour as an adjunct in the mash. And you can’t say the Belgians don’t make good beer.
By the way: A 2-outlet faceplate runs you about $2, cowboy.
I like beer. For better or worse, this has been a mantra that I lived by from the age of 18-present day 47. I can’t drink like I used to, but I still really enjoy drinking beer. My wife has never had a problem with the beer drinking, because it was (mostly) on the weekends and I never changed my personality while I was drunk so it almost never caused me any problems. The following story is one of the times it did, but it turned into a positive thing in the long run.
In December of 1990 I was a 19-year-old Lance Corporal and had been stationed on Okinawa for 8 months. On a Wednesday, I ran into my drinking buddy from Fort Sill, Pete. He had just gotten to the island on a six-month deployment. We had to go drinking that night even though I had to be up at 4:30 for a machine gun shoot Thursday morning. It started as “I’ll just have a few beers and be back by midnight so I can get 4 hours of sleep.” (It was so great to be young.) We went bar hopping and somehow wound up at the Sunabe Seawall at around 11:30.
I met this pretty Okinawan girl, she was 22 and we REALLY hit it off. She and her friend had just watched the movie Ghost and came to the seawall for a little bit before they went home. Next thing I knew it was 2:00. Man, WE HAVE TO GO!! The girl is nice enough to drive us to the front gate, but as I get out of her car I realize my wallet is missing because the bottom of my pocket was ripped. She took me back and we found it, but instead of coming back we sat and talked for another couple of hours (not getting any sleep anyway at this point). She drives me back and I get to my room as reveille was sounded at 4:30.
I shaved and got into my cammies and still had 45 minutes before formation, so I had the fatal thought “I can take a nap” figuring that I would hear when everyone went down for formation. To quote Charlie Murphy, “WRONG!!”. To make matters worse, my section Chief and the A chief were in school so nobody noticed I wasn’t at formation.
I woke up at noon.
Not sure what to do, I started helping the rear party with cleaning the barracks in preparation for our weekly cleaning (field day) and was terrified when I heard the 5 tons come back, but trying to be slick, I went down and started cleaning the .50 cals, MK 19’s, and M60’s. Suddenly I hear my Platoon Sergeant yelling for me to get my stupid ass in his office NOW.
“WHERE THE FUCK WERE YOU?!?!?!”
What to say? I suck at lying and I think I’m in enough trouble without adding to it so I didn’t know what to say except to tell him exactly what happened and why. No excuses, just the truth.
“Talked? I’m not even mad. I’m dissapointed.”
He shook his head and told me to go back out. I thought my career was over, I would never get promoted and maybe kicked out. He never said another word about it, but for at least six months, every time there was a shit detail he would look over the formation and when he saw me he would do a double take, yell my name, say “Holy Shit, you’re here. Thanks for volunteering.” Much guard duty was stood, and many hours were spent picking up trash and brass.
The positive thing to come out of that night: the girl I met has been married to me for 24 years now.
Now for reviews of my BIF from L0b0t:
Black Duck Porter by Greenport Harbor Brewing Company 4.7% ABV: Excellent example of a high quality Porter. Nothing extra, just right. 4.25/5
Common Sense Kentucky Style Ale by Upstate Brewing Company 5.3% ABV: Very easy to drink reddish ale. Good taste of hops, but not too strong. 4/5
Hawaiian Pizza IPA by Rockaway Brewing Company 5.9% ABV: I was skeptical about this one, but there was a pineapple beer in my last BIF package that was enjoyable, so let’s see.
Is this grapefruit juice? One swallow and I’m done (TWSS) 1/5
I give it to my wife (not a beer drinker) and she tastes it says “I can drink it, but it doesn’t taste like beer” She gives it 2/5
…FILLS HIS VICTIMS FULL OF DREAD
Heavy Boots of Lead by Single Cut Beersmiths 11.2%ABV: Pours like motor oil out of my Cummins BLACK and THICK. Even the foam is dark. Can’t see a light through it.
Tastes like an imperial stout, but there is a lot more to the flavor. Very thick and heavy but in a good way, hard to explain. I would never guess this was 11.2 %. I like it a lot and wish I could find this around here. 4.5/5
High Ryse by Iconyc Brewing Company 7.5% ABV: Very smooth Saison beer. Not my favorite type of beer, but it definitely got better as it went down, really liked it by the end. 3.75/5
First drink and I think” this is the perfect beer” almost reminds me of Double Bastard, one of my all-time favorites. 12%, but it goes down way too easily. I love this beer, my next trip to NY I will definitely be looking for this and the High Ryse. 4.75/5
Super Kitty by Keegan Ales 12% ABV: Bottle has a pop top like Grolsch, and it’s wax sealed. Excellent red color and nice “beer” smell. My wife smells it and recoils in horror.
Thanks again Nephilium for coordinating all this and also thank you l0b0t for the excellent beers.
Yes, at long last we’ve stepped through the various ways of making alcohol and have made it to the hardest to make. Beer. Over the next couple of installments, I’ll be going a bit more in depth on the ingredients used to make beer, but let’s get started with the equipment you’ll need to make a simple extract batch.
To begin with, the first thing we’ll need is a brew kettle. Unlike most other types of fermentation, beer requires being brought up to a boil for a time in order to sterilize it, use the alpha acids in the hops, and to help get a clear beer. Any kettle can work for a brew kettle, as long as it’s large. Most will also have a spigot put into them to allow you to get your wort (unfermented sweet barley water) into a fermentor more easily. Now, most beer recipes for homebrewing are written for a 5 gallon batch, that means if you want to do what’s called a full boil (the full volume of beer is boiled at once), you’ll need at least an 8.5 gallon kettle. Why the extra 3.5 gallons? Well, first you really don’t want a kettle full of boiling liquid full to the brim. Second, you’ll be boiling off water as you get the wort up to a boil, and during the time it’s boiling.
Then, you’ll need a wort chiller. While wort chillers are technically optional, you’d be hard pressed to find someone telling you they aren’t a worthy investment. You can make your own fairly easily as long as you have access to copper (or stainless steel) tubing, a way to bend it, and a way to get hose attachments on to it. Wort chillers are used to bring that boiling pot of wort down to a temperature where it’s safer to move it between vessels, and bring it down to a temperature where you can pitch your yeast.
But Nephilium, I’ve got this 4 gallon pot, and SWMBO (She Who Must Be Obeyed) has said that I can just put an ice bath in the tub to chill my beer. If you can’t do the full boil, you’ll be doing what’s called a partial boil. This means you’ll be boiling a partial amount of your total volume, then topping it off with water. Since the top off water doesn’t have to be boiling it will help with the cooling process. In general, if your tap water is safe to drink, you can just add it directly in for the top off, although that has a risk of infection. If you want to be safer, boil the water once, let it cool, and put it into a sanitized fermentor a day or so before.
Finally, we’ll talk about the two different basic types of malt extract. You can buy it either in a liquid form (LME) or in a dry form (DME). The liquid form will have the consistency of syrup, is slightly easier to mix into hot water, but will spoil faster and is harder to do measurements of. The dry form will have the consistency of powdered sugar, which means it’ll very easily coat things with a sticky mess, but can be kept around much longer as long as it’s kept in an air tight package and away from humidity.
So let’s go with a recipe. This is for a basic Saison, a style that is more descriptive than prescriptive. It is a traditional style brewed in France and Belgium at the time of the harvest, and was used to pay workers in the fields. I’d recommend following the recipe as written once, but then you can adjust it by adding rose hips and lavender, tart cherries, currants, peach juice, or whatever you would like.
Base Saison: 90 minute boil; Final volume 5 gallons
Ingredients:
2 lb. Wheat Dry Malt Extract
3 lb. Pilsen Dry Malt Extract
3 lb. Extra Light Dry Malt Extract
2 oz. Saaz hops
1 package Saison yeast (make sure it’s not a bacterial blend), I’ve had great results with the White Labs WLP565.
~7.25 gallons water (your amount may differ based on different boil off amounts)
Note: If you can’t find DME, you can substitute LME for it, just up the amounts by about 10%.
Method:
Prepare all of your ingredients, you’ll be separating the hops into two amounts 1.5 oz and .5 oz. Get your water up to a boil, then we’ll be adding the malt extract. Turn off the heat, add in the extract and stir. Then stir some more. Make sure the extract is mixed into the water. Get the water back up to a boil, and once it starts boiling put in 1.5 oz of the Saaz hops, and start your timer. 70 minutes into the boil (20 minutes before you turn off the heat) add in the last .5 oz of hops, and your wort chiller (but don’t start the water flow, we want to sanitize it). When your timer runs out, turn off the heat, and turn on the water flow for your wort chiller. You’ll need to move the wort chiller around every once in a while to help chill it down. It’ll take 20-30 minutes at least to chill your wort. If you want to pull a sample to check your gravity, it should be at about 1.060. At that point, move it to your fermentor and pitch your yeast. Let it ferment for 3-4 weeks, as the Saison yeasts can take some time to finish off, and the beer should finish up at around 1.005 (or lower). Saison yeasts are fairly heat tolerant, so you don’t need to worry so much about fermentation temperatures, but just keep the beer stable. After it completes fermenting (remember, 2 checks at least three days apart with the same gravity reading) bottle it, let it condition, and enjoy it.
Give me yesterday’s bread, this day’s flesh, and last year’s cider. (B. Franklin)
Most Americans have no idea what cider really is or its place in American history. The founding fathers brought apple trees and presses from England to the colonies. Everyone drank cider – morning, noon, and night – including children who drank watered-down cider. Apple trees and cider-making followed the settlers to the west. Nearly every homestead produced apples and cider.
The industrial revolution was the beginning of the end for cider consumption in America. As the population moved into cites, it became difficult to distribute cider in large enough quantities to serve the population. German immigrants in the mid-1800s brought beer-making processes and technologies to America that allowed for large-scale production of lagers. City-dwellers became beer drinkers, and cider-drinking was relegated to the country bumpkins. Prohibition killed what was left of cider production in the America. Orchards across the country ripped out cider apple trees and replaced them with eating apples and culinary apples. Now that cider is making a resurgence, orchards are frantically replanting cider apple varieties, but they are not keeping up with demand.
So, what is the difference between eating apples, culinary apples, and cider apples. Modern eating apples are basically just bags of sugar water with enough acid to keep them from being cloyingly sweet. They are crunchy and extremely juicy, which is desirable in an eating apple. But these juicy apples, actually have fairly low concentrations of sugar in the juice (typically about 10% sugar by weight). And, they don’t have much in the way of distinctive flavors. When you ferment away the sugar, you are left with modest alcohol levels (5% ABV) and bland flavors. Culinary apples are used for cooking or baking. Both tend to be high in acid. This provides sharpness to balance the sugar that is added during cooking and baking. Culinary apples can be used to make cider as they increase the acid level in the final product.
Cider apples generally fall into four categories based upon the relative levels of acid and tannin in each variety. If you are a wine geek, you understand that acid and tannin provide the structure and determine the mouthfeel of a wine. Acid and tannin serve the same purpose in cider. Acid makes your mouth water and conveys crispness in the product. Tannin provides bitterness and astringency (makes your mouth feel dry and sticky).
The most common cider apples were developed in England and France starting in the 1600s and continuing into the 1800s. The flesh of these apples is course and chewy, but it releases juice better than a modern apple when being pressed. The apples tend to be drier (less juicy) than modern apples, but they have much higher concentrations of sugar. Cider apples have complex, earthy flavors that are more intense than modern apples. These flavors carry over into the final product.
Sweet apples. These apples produce juice with very high concentrations of sugar – upwards of 19% sugar by weight (Brix). If fermented to dryness, this will produce alcohol levels to nearly 11% ABV.
Sharp apples. These apples produce juice with very high concentrations of malic acid, but relatively low levels of tannin. Sharp cider apples are similar to culinary apples, and some varieties of apples are used for both purposes.
Bittersweet apples. These apples produce high levels of both sugar and tannin. These apples also provide the classic cider flavor in traditional English and French ciders.
Bittersharp apples. These apples product high levels of both acid and tannin.
True cider apples are commonly referred to as “spitters”. They are either so tart or so tannic that you spit them out if you take a bite. One book on cider making from the 1800s stated that the best cider apples were so harsh the neighbors wouldn’t steal them and the pigs wouldn’t eat them when they fell on the ground.
Generally, cider is made from a blend of all four types of cider apples with roughly 40% from sweet apples, 30% from sharp apples, 20% from bittersweet apples, and 10% from bittersharp apples. The primary purpose of the sweet apple is to provide sugar for making alcohol. The sharp apples provide the acid for crispness, and the two types of bitter apples provide the tannin which completes the mouthfeel of the cider. A well-made cider is dry, acidic, and tannic. It has more in common with a dry red wine than the alcoholic soda pop that dominates the market right now.
It is rare for a cider to be made from a single variety of apple, but it can be done. Single-variety apple ciders typically use some variety of bittersharp apple which has all the necessary ingredients to make a balanced finish product – high sugar levels, high acid, high tannin levels, and complex flavors. Any single-variety apple cider you see on the market will be from a bittersharp apple (e.g., Kingston Black).
So, what are the options for a home cidermaker:
Become really good friends with someone that grows cider apples and will share them with you instead of selling all of them into the commercial marketplace (or keeping all of them for themselves).
Plant your own trees and wait (I planted in 2014. I should be getting apples soon).
Make do with alternatives from your local orchard.
Learn to make cyser (apple mead – subject of a future article).
Seriously, don’t go there. The soft cider that you buy in the grocery store or at your local orchard is generally a blend of juices from modern eating apples. It is sweet and barely tart. If you ferment it, the sweet will be gone, and what is left will be bland.
The rest of this article is focused on option 3) above – making do with the apples you can find in your local orchard.
This means buying fresh apples, crushing the apples, and pressing out the juice. You need apples that provide complex flavors.
Focus on heirloom varieties, particularly classic apple-pie apples – varieties that originated 100 years ago or more. These apples will be in the neglected part of the orchard. No one wants these apples, but the owner of the orchard hasn’t pulled them out yet (it’s not really that bad, but it has some resemblance to reality). Old apple varieties tend to have rich earthy flavors that are clearly “apple”, but still “different” from anything you are used to. Modern eating apples are pale in comparison to heirlooms. The texture of these apples is weird. They do not crunch. They are chewy and even a bit rubbery. It is off-putting if you grew up on red delicious and have moved on to Galas or Honeycrisp.
The next apples you want are crabapples. Really. Every commercial orchard has crabapples. These apples produce vast amounts of pollen and are in bloom for a long time. Thus, they are valued as great pollinators in orchards. But orchards will grow crabs that are useful for other purposes as well – mostly for making jellies and jams. Some crab apples are sweet, but many are very high in acid.
The good news is you can make great cider without access to classic cider apples.
The bad news is that not all apples blend well together. The first year I got serious about making cider, I worked with 15 different varieties of apples. In the end, I made 6 different blends. Two were great (I kept those for myself); two were good (I gave those to good friends); and two were OK (those became party booze – make it sweet; put it in a keg; the drunks love it). A lot of experimentation is required. The best blend that I made included roughly equal parts of cider made from Whitney Crab (sweet yellow crabapple), Spartan (child of McIntosh, red with white flesh and wine-like flavor), Rhode Island Greening (one of the two oldest varieties in America, green with yellowish flesh, outstanding apple-pie apple), and Dolgo Crab (red with white flesh, shockingly sour, but actually has the highest sugar concentration of all the apples used that year).
To make things more complicated, apples harvest anywhere from early August to late October. The apples you most care about don’t harvest at the same time. Crabs typically harvest in early August and heirloom apple-pie apples harvest in October. This means you make cider from individual varieties and then blend them some time later.
Now to walk through the process of making of a single batch of Dolgo Crab Apple Cider.
You will need two crucial pieces of equipment – something to crush apples and something to press the juice out of the crushed apples. There are many different configurations of crushers and presses. Apple crushers have fingers that shred apples and grinders have blades that do the same. It’s a bad idea to run your hand through either one of them. Vertical basket presses are the lowest cost style of press to start with and come in two basic configurations – a grape/wine press or an apple/cider press. Either will do the job. They look similar but are different. The T-handled apple press can be used without nailing it to the ground. The wine press must be fixed in place or it will turn in circles as you crank on the handle (foreshadowing amusing photos in the upcoming wine article).
Apple Crusher in Home-Built Stand
Whether you use a crusher or a grinder, the basic process is to put apples in the hopper and turn the crank. I have a hand-cranked crusher. With a little ingenuity, this can be converted into a motorized crusher. The next one I buy, when the orchard is producing, will be motorized.
Dolgo Crab Apples in the Hopper
Dolgo crab apples are about the size of a large cherry. They run through the crusher with ease. The fingers on the crusher are quite small. So, any apple bigger than these crab apples needs to be cut into halves or quarters depending on how big they are. While this seems like extra work, it means you get a chance to examine each apple and discard any that show signs of spoilage.
Dolgo Crab Apples after Crushing
When you turn the crank, the fingers inside the crusher shred the apples. The shredded apples fall out of the bottom of the crusher and into a bucket. From here, the apples go into the press. There is one serious problem to contend with when using a vertical basket. The juice must flow from the apples in the middle of the basket to the outside where gaps between the slats allow juice to exit the basket. Unfortunately, crushed apples (and grapes for that matter) are basically slimy little pieces of fruit covered in sticky juice. When you squeeze two fruit pieces together, they form a water-tight seal. So, juice that is in the middle of the basket can’t get out. The solution to this problem is to mix rice hulls into the crushed fruit (all-grain brewers will be familiar with this trick). The rice hulls act like little straws providing channels between the pieces of fruit so that juice can flow between the pieces even under high pressure.
Standard Vertical Basket Apple Press
A couple of important notes. First, all apples oxidize; some faster than others. If you cut an apple in half and leave it on the counter, the exposed flesh will turn brown. If you crush and press fresh apples, the juice will turn brown as you watch. This is concerning to a beginning cidermaker, because, in almost all cases in brewing, oxidation is a bad thing. However, in cider, oxidation is a key part of the flavor profile of the finished product. And much of the browning will be reversed during fermentation thus yielding the classic yellow-gold color of cider. Note that heat also produces browning (ask the food geeks at Glibs about the Maillard reaction). So, pasteurization of apple juice can contribute to browning. But the browning due to pasteurization does not produce desirable flavors and will not be reversed during fermentation.
Second, I learned the hard way to line the wooden basked with screening material (I now buy screen door repair fabric at the hardware store). If you don’t line the basket, pulp and seed will be squeezed into the spaces between the wooden slats. This is a pain to clean up afterward.
Primary Fermentation
One of the nifty features of Dolgo crab apples is the red pigment in the skins will rub off on your hands. It is also highly soluble. This results in pink colored juice running out of the press. I sliced the skins off a dozen or so apples and put them into the primary to enhance the color. Normally, I add oak cubes to secondary fermentation, but for this batch, I added medium toast French oak cubes in the primary. The cider was fermented with an English ale yeast (Wyeast 1318 London III). Note the primary is a Rubbermaid Brute which has a loose-fitting lid. There is no need for an airtight seal during primary fermentation.
Secondary Fermentation
After a week or so in the primary, the cider was racked to a 6 ½ gallon glass carboy. An airtight seal is provided by a rubber bung with a S-shaped airlock. It appears that I carried over the oak cubes from the primary because a week really isn’t long enough exposure for cubes. This is the time when a bacterial culture is introduced to the product to perform malo-lactic fermentation – the conversion of malic acid to lactic acid (the acid found in milk). This fermentation takes two or three months.
At some point, this batch of Dolgo cider was mixed with other batches of cider. Fining agents were used to clarify the blended cider (I really like Super Kleer). After it cleared, it was bottle conditioned by adding 1 ounce of raw cane sugar per gallon of product and bottling in beer bottles. This resulted in a sparkling, semi-dry cider.
Sometimes I keg and force carbonate. This allows the cider to be back sweetened and stabilized with potassium sorbate. The resulting product can be semi-sweet or sweet depending upon the target audience for the kegged product (party booze generally needs to be sweet, because there aren’t enough educated cider drinkers out there).
There are other major issues to consider.
Brewers will generally work with three types of acid in fruits: citric acid from citrus fruits (and many types of berries); tartaric acid from grapes; and malic acid from apples (and also many types of berries and grapes). For any given acid concentration, malic acid has the harshest flavor and mouth feel. Lactic acid has a much smoother flavor and mouth feel. Converting the malic acid in cider to lactic acid makes the product softer and smoother even at high acid levels (this is commonly done in a lot of red wine styles as well). So, malo-lactic fermentation provides great benefits to cider, but it comes with a significant risk.
The bacteria that convert malic acid to lactic acid are highly susceptible to potassium metabisulfite (sulfite) which is used to protect against spoilage organisms like Brettanomyces. And Brett lives everywhere. It is on the skins of fresh fruit. When you crush and press fresh fruit to make cider or wine, it is in the juice. It is essential to add sulfite to the fresh juice to kill spoilage organisms at the start of fermentation. Sulfite also works to prevent or reverse oxidation. When you put small amounts of sulfite into highly oxidized apple juice, it will chemically interact with the oxygen and become neutralized (read a book on wine chemistry if you care about the details). Thus, the amount of free sulfite in the juice drops quickly (this is complicated and could be the topic on a stand-alone article).
The goal is to introduce enough sulfite into the fresh juice to kill the spoilage organisms present on the fresh fruit, but at a low enough rate that there will be no free sulfite left by the end of primary fermentation. You can then rack into a secondary, pitch malo-lactic bacteria, and wait for 2 or 3 months for the bacteria to work while hoping your sanitation was good enough so that you didn’t introduce any new spoilage organisms going from primary to secondary. And the mathematical formula for getting that right is – I have no idea.
My process, which has worked so far, is to prepare a 1-quart spray bottle with a solution of 1 tsp of sulfite and 1 tsp of citric acid (sulfite works best in high acid solutions). I press juice into a small bucket. When the small bucket is full, I pour it into a large bucket and spray the juice with a couple of squirts of sulfite solution. Then I cover the large bucket with a lid while I continue to press juice. Eventually, all the juice is poured into a primary fermenter which was sanitized by spraying it down with the same sulfite solution. This seems to get enough sulfite into the juice to prevent spoilage while not carrying enough sulfite into the secondary to inhibit malo-lactic fermentation. After a couple of months of malo-lactic fermentation, I add about ¼ tsp of sulfite to each carboy. This will prevent spoilage during long-term aging.
About a week ago it finally happened. People in my office began to celebrate the holidays. First it was the fake, pre-lit tree they couldn’t assemble, and the one person in the office that knew I used to be an electrician ran me down as I walked in. So I assembled it. More irritating was they decorated my cube with a poinsettia.
This is my review of Ridgeway Brewing Bad Elf Winter Ale
But first! I thought I called last call for BIF. Apparently, that is meaningless like most of the rules here. The problem is, this last one is something I should probably put on it own, so I’ll put it on its own later, because it’s a good story. Thats right, f*** it. We’ll do it live.
The plant in question hasn’t always been a staple around the holidays. It smells pretty neutral, doesn’t really need a lot of watering. Its just got red and green leaves, but there’s more to the Poinsettia. Much, much more.
The plant itself is indigenous to Southern Mexico and was originally cultivated by the Aztecs to make a dyes. Later the plant’s sap was discovered to make latex. That’s right—Mexicans gave you the material to make condoms, rubber bands, and a slew of other stretchy things. Let thet soak in for a second.
If not for the efforts of Joel Poinsett, Americans may not know or care for the plant at all. Poinsett was the first Ambassador to Mexico and appointed by James Madison. He had a thing for botany, which given the absurd number of people that grow vegetables to decompress from the modern world, doesn’t sound all that unusual. He happened to like the plant and sent several back to his home in South Carolina.
Pepita, a poor Mexican girl who had no gift to present the Christ Child at Christmas Eve Services. As Pepita walked slowly to the chapel with her cousin Pedro, her heart was filled with sadness rather than joy. I am sure, Pepita, that even the most humble gift, if given in love, will be acceptable in His eyes,” said Pedro consolingly.
Not knowing what else to do, Pepita knelt by the roadside and gathered a handful of common weeds, fashioning them into a small bouquet. Looking at the scraggly bunch of weeds, she felt more saddened and embarrassed than ever by the humbleness of her offering. She fought back a tear as she entered the small village chapel.
As she approached the altar, she remembered Pedro’s kind words: “Even the most humble gift, if given in love, will be acceptable in His eyes.” She felt her spirit lift as she knelt to lay the bouquet at the foot of the nativity scene. Suddenly, the bouquet of weeds burst into blooms of brilliant red, and all who saw them were certain that they had witnessed a Christmas miracle right before their eyes.
From that day on, the bright red flowers were known as the Flores de Noche Buena, or Flowers of the Holy Night, for they bloomed each year during the Christmas season and thus, the legend of the poinsettia was born.
Its a miracle! In 1851, Congress would later declare December 12 to be National Poinsettia Day. Why do that? Turns out Poinsett was a pretty big deal. He only helped found the Smithsonian.
This beer isn’t too bad. Its a traditional English ale, with a bit of spiciness as a twist. Not a bad combo but ultimately left me searching for that hated bananna flavored residue from the yeast they use over there. Eventually I found it. Ridgeway Brewing Bad Elf Winter Ale 3.0/5
Many dishes at my holiday table are vegan by nature, like maple acorn squash, three bean salad, raw veggie platters, and cranberry sauce. But most holiday dishes aren’t vegan, which makes it a challenging time of year.
Mr. WebDom and I are in the middle of moving this month, so I haven’t had a chance to do much cooking. Instead of delighting you with one of my custom recipes, I thought I would do a round up of Vegan Holiday Recipes to inspire you this holiday season.
Vegan Christmas Roast
Image from The Easy Vegan
The Easy Vegan put together this recipe, which I keep meaning to try. I expect I will in January once I get my kitchen at the new house setup.
OMWC has tried this recipe using this brand of wheat gluten and it seemed to work well. There was something that he wanted to improve, and I’m sure he’ll mention it in the comments.
While this is not a recipe, I do want to mention the Gardein Holiday Roast. It’s delicious and tastes far more like turkey than you would expect. I had it with SP and OWMC last year. This year I tried the smaller single serving version for Thanksgiving. It’s awesome, and definitely hit that “holiday” food jones.
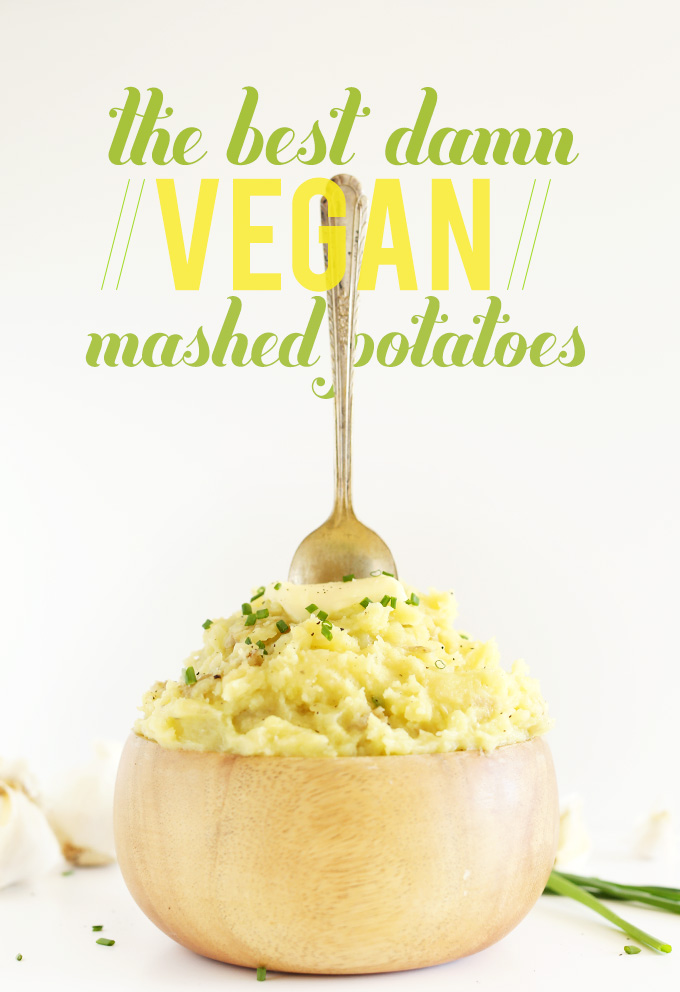
The Best Damn Vegan Mashed Potatoes
Image from Minimalist Baker
Mashed potatoes are a necessity at any holiday table. Most of the time, they’re not vegan. On Thanksgiving I gave in anyway and tried the mashed potatoes my sister in law made. The phrase wallpaper paste comes to mind.
For Christmas I’m doing the mashed potatoes and I am using this recipe by Minimalist Baker. It’s simple, requires only a few ingredients, and looks like it will fool my non-vegan relatives.
Vegan Stuffing
Sadly, I have no photo for this one.
But, Epicurious has the best vegetarian stuffing recipe I’ve ever seen. It uses butter, but I just swap for a vegan alternative. Aside from just being, well, delicious, I love that stuffing is simple, and easy.
Vegan Eggnog
Image from Simple Vegan
I. Fucking. Love. Eggnog.
Yet it’s very much not vegan.
Then I discovered this recipe last week. As soon as I get a blender, I’m doing it! It uses coconut milk and cashews to create the consistency and flavour profile. Supposedly (I’m a little skeptical…) it tastes very close to the real thing.
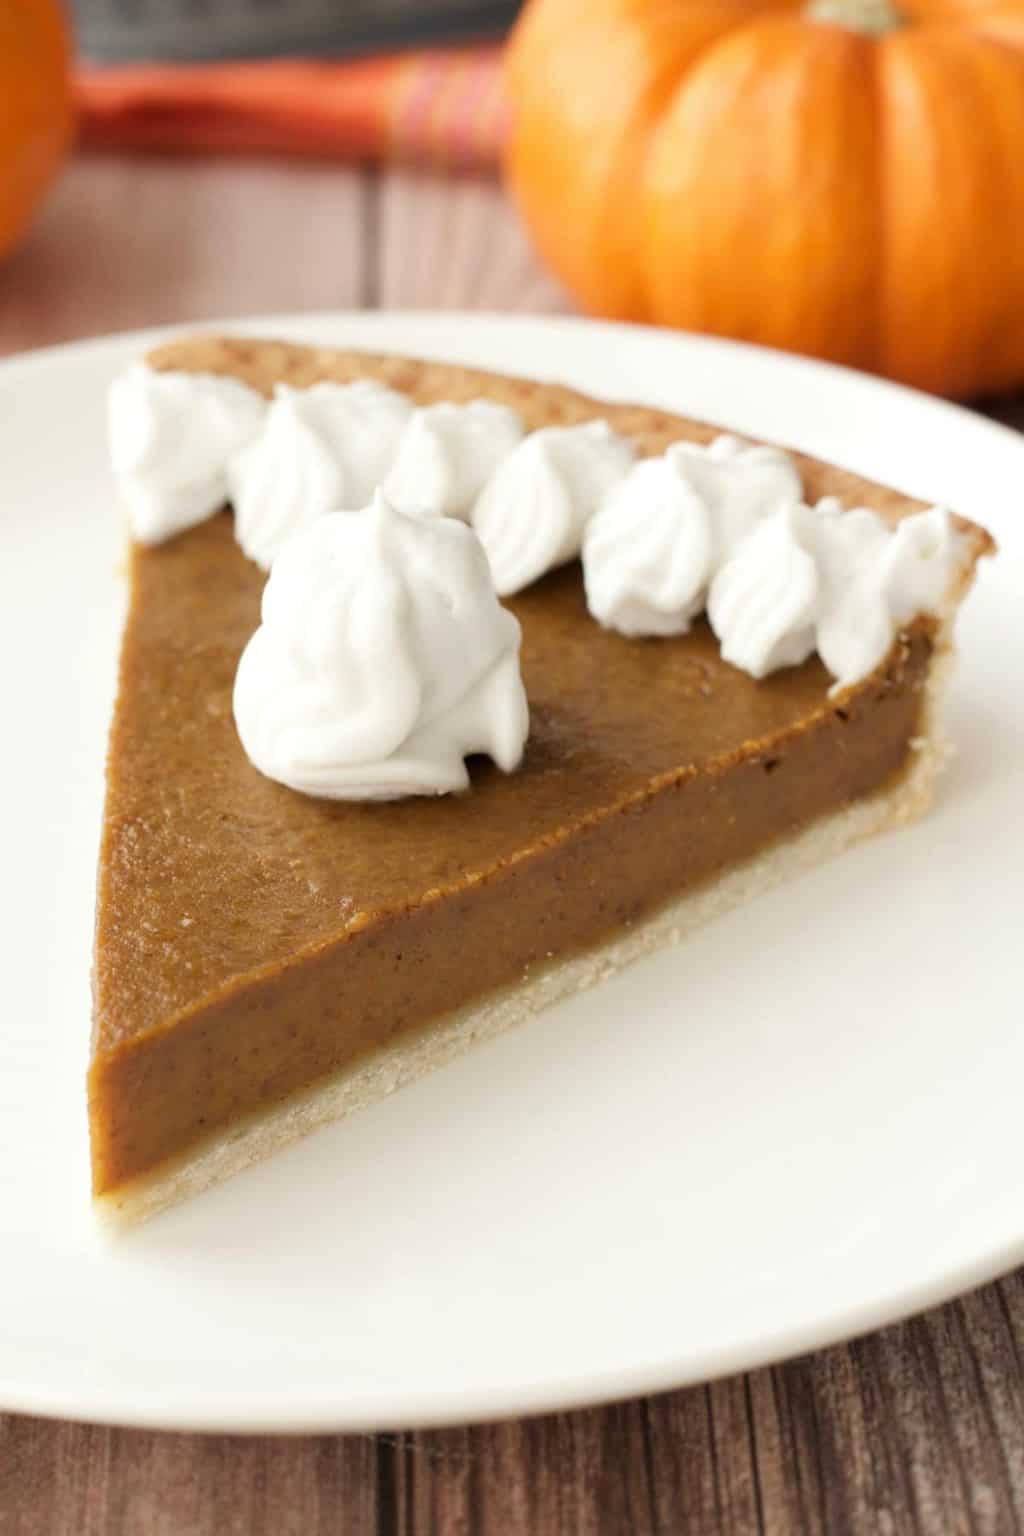
Vegan Pumpkin Pie
Image from Loving It Vegan
Uhm, yes, please. I didn’t get any pumpkin pie yet this year because I had to leave my family’s Thanksgiving Dinner before pie. (Migraines suck.) I am going to be making this pumpkin pie recipe as soon as my kitchen is setup again. This recipe from Loving it Vegan uses full fat coconut milk in place of the cream. After much searching, I prefer this brand of coconut milk. No other brand even comes close.
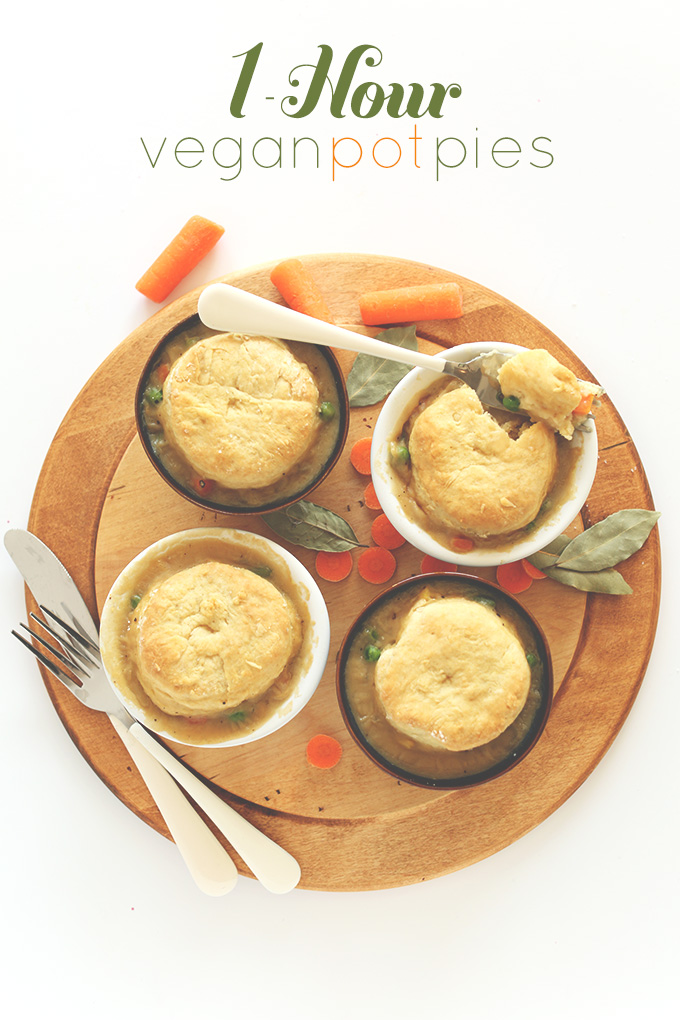
Bonus: Vegan Pot Pie
Image from Minimalist Baker
Not really a holiday recipe, but the holidays always make me crave pot pies. I usually make pot pie in a 9×11 pan, and between the two of us, we usually finish it off in one night. Maybe two if we use restraint. I’ll post my recipe next time I make it (because truth be told I don’t measure anything unless I’m turning it into a recipe for you guys).
So we’ve made cider and wine, let’s move on to what is commonly claimed to be the oldest fermented beverage in the world, Mead. What is mead? Mead is a fermented beverage where the majority of the sugars are coming from honey. Honey is naturally antibiotic, and is unique in that it doesn’t spoil (while it will crystallize, it stays edible). So, since we want the yeast to survive, we’re going to need to water it down. There’s several different paths you can go to add water to the honey, each with different drawbacks:
Boiling – Get water up to boiling, then add in honey. This runs the risk of scorching the honey, as well as driving off aromatics, but will ensure that the honey is equally mixed into the water. You’ll also need a way to cool the must before putting it into a fermentor and pitching yeast.
Hot water – Get water up to ~160 F, and mix in the honey. This will help the honey dissolve, but will drive off some aromatics. This also may require some method of cooling before putting it in a fermentor and pitching yeast.
Cold water – Mix water with honey. This will require more mixing and more stirring to make sure the honey is fully dissolved, has the highest risk of infection (still not a high one), but preserves the honey aromatics the best.
You won’t need any new equipment for making mead, but you may need a couple of additional ingredients. Yeast nutrients and yeast energizer. Fruit (and barley) have the compounds that yeast need naturally occurring in them, honey does not. While you can make mead without yeast nutrients and energizer, using both will help the yeast do well and convert the sugars into alcohol. With the cost of honey, it’s well worth the extra couple of dollars to ensure a good ferment.
There’s an ongoing debate in most of the mead forums about the best way to use yeast nutrients, with everyone certain that their way is the best (sound familiar?). You can either add it all in at the beginning of fermentation, you can do step additions (add 25% at the beginning, then an additional 25% each following week).
For those who think there’s too many different styles in beer, there’s a large list of different types of mead. For those of you here, I’m guessing the most popular will be:
Braggot – A mead made with malted barley and honey
Capsicumel – A mead flavored with chili peppers
Cyser – A mead that users cider instead of water to dilute the honey
Hydromel – A light/low alcohol mead (think around 5% ABV)
Pyment – A mead that uses grape juice instead of water to dilute the honey
Sack mead – A strong mead with more honey then a standard mead (to get to ~15% ABV)
For your standard mead, plan on between 2.5-4 lbs.of honey per gallon. Adjust as you wish for higher/lower ABV, and based on if you’re using a fruit juice to dilute (which will have sugar of its own). Be aware of the different types of honey, and realize that they will have different flavors when the fermentation is done. I recommend starting with small batches until you find something you like, then ramping that up to a higher volume.
Now for the recipe of a mead I made that came out really well, and should be ready for your next Thanksgiving. Yes, I’m talking about the one in 2019, most meads do well with a lot of mellowing and aging on them. Since it’s a 1 gallon batch, I generally bottle this into about ten 375 ml bottles instead of risking only getting four and some change into 750 ml bottles (remember that there’s sediment you don’t want in your bottles).
Cranberry Mead (1 gallon batch):
1.5 lbs Cranberries – Reduced to juice (or just buy cranberry juice)
3.5 lbs honey
Water to top off to one gallon
Blend the cranberries (or buy juice) and run the resultant liquid through a filter. Mix that with 3.5 lbs. honey and top off with cold water to get to one gallon. Shake it up (which will both aerate it, and make sure that the honey is mixed in with everything else) until the honey is dissolved. Figure out what nutrient schedule you want to use, and pitch a white wine yeast. Fermentation will take at least a month, so be patient with this one. After fermentation is done, wait for it do drop clear (sediment will settle at the bottom of the carboy), then bottle it up.
So, I’ve run a couple of these BIF’s, and here’s the shipment that I received in the most recent one:
A nice new nonic glass, and several new to me beers.
Let’s start with one I’ve had before, but still enjoy. Southern Tier Harvest Ale: Nice citrus hop aroma, with an undertone of tannin. Very pale, small head, and moderate carbonation in the appearance of the beer itself. But the flavor is there, sharp crisp hop tastes slowly fading away. I really wish this was available year round. 3.8/5
Moving on to another one that had a great old ((ad)) campaign, formerly known as just He’Brew Messiah: Sweeter aroma then the ones I usually go for, a slight hint of hops hiding behind a caramel/nutty aroma. Pours a dark reddish-brown, with a fluffy white head. Yep, there’s the nutty notes, and just a wisp of hops lurking behind it. A drinkable beer, but not one I’ll be going for again. 3/5
On to the new to me beers. Saranac 1888 Oktoberfest: Pours a clear golden-copper with a full white head. Aroma is a touch of caramel and biscuit, with some earthy notes. Flavor is not as sweet as some Marzens, with just a kiss of caramel. There’s some earthy and spice notes from the hops in the finish. 3.68/5
Orbital Tilt: Vic Secret: Big bright citrus hop aroma, with some mango underneath. Pours a nearly opaque orange with a dusting of white head. A touch of caramel sweetness starts off the beer, which then rolls into pine, pith, grapefruit, and a touch of sweet mango. This fades away leaving a long lingering bitter finish. Rich mouthfeel, with just enough carbonation to keep it from getting cloying. 4.24/5 One of my favorite from the batch.
Light crisp aroma, with a touch of noble earthy hops. Pours a mostly clear pale straw with a quickly fading white head. There’s a touch of malt sweetness, which fades to a mild earthy bitter finish. A light body, and nice carbonation keeps this an easy drinking pils. 3.67/5
Brown’s Oatmeal Stout: Pours a clear dark ruby with a dusting of light tan head. Rich roasty aroma, with a touch of coffee in the end. Slick mouthfeel, with a fullness from the oats. Starts with a slight note of milk chocolate, which fades to roast, with a touch of acrid notes in the finish. Not enough to be overpowering, but enough to be noticed. Overall, a solid Oatmeal Stout. 3.62/5
I hope you all have enjoyed hearing us geek out about beers, and feel free to jump into the next BIF (currently scheduled for late April/early May, unless someone else wants to run one… hint hint).
By DEG (who Kinnath shipped to):
Thanks to Kinnath for sending some good beers. My ratings are simple:
“Would” for “Would Drink Again” and “Would Not” for “Would Not Drink Again”.
Oja from Iowa Brewing – An excellent Baltic Porter. Rating: Would.
Oktobot 3000 from Lion Bridge Brewing – Lion Bridge aged this Märzen in Water of Life barrels. The Water of Life overwhelmed the Märzen. Rating: Would Not.
CoCo Stout from West O Beer – A Milk Stout with Chocolate. Quite tasty, and not enough lactose to send me running to the toilet. Rating: Would, but only in small quantities.
Oktoberfest from Confluence – The only problem with this beer is I didn’t have enough to fill a Maß. It is competitive with some Märzens I had at the Wiesn. Rating: Would.
G. G. from Exile – A dunkel lager. It was flat, but still rather tasty. Rating: Would Not unless they fixed the carbonation.
Compensation from Lion Bridge – An English Mild. It had a nice roasted, malty character. Rating: Would.
Not DEG’s photo
Tragedy of the Common from Iowa Brewing – Beeradvocate shows it as a California Steam Beer but the label says it is an Amber Lager. The name made me laugh at a time I needed it. I just got home from traveling for a funeral, and my BIF box was waiting for me when I got back. I saw this bottle’s label and laughed. Rating: Would.
My favorite? It’s a threesome – Oja from Iowa Brewing, Compensation from Lion Bridge, and Oktoberfest from Confluence.


 To begin with, the first thing we’ll need is a


 About a week ago it finally happened. People in my office began to celebrate the holidays. First it was the fake, pre-lit tree they couldn’t assemble, and the one person in the office that knew I used to be an electrician ran me down as I walked in. So I assembled it. More irritating was they decorated my cube with a poinsettia.