Author: Nephilium

  • Enslaving Yeast – All Grain Beer Part 2 – Bittering agents

    Enslaving Yeast – All Grain Beer Part 2 – Bittering agents

    Time to move on to the next part of brewing: bittering agents.  The oldest known bittering agents were herb blends (the most famous being gruit), the modern bittering agent of choice is hops.  The herbal beers are still being made today (but not a lot of it) by some of the American craft brewers looking to revive old styles and flavors. There’s lots of options for brewing with herbs instead of hops, here’s an article that talks about the various herbs, and how to use them.

    We’re in the modern age now, which in the beer making world means almost a thousand years of history.  So that means hops are the primary bittering agent. The bittering component of the hops is known as Alpha Acids, and any hops you buy from the homebrew shop will have an AA% on them.  These get measured in a final beer by a scale called IBU (International Bittering Units). IBU’s aren’t the final determination in how bitter a beer tastes though, as that will depend on the residual (or non-fermentable) sugars left in the beer.

    If you’re looking to replicate a recipe exactly, the AA% will be important to you.  Most recipes will have the variety of hops, listed with an AAU number. That number is just the AA% times the weight in ounces.  So, for an AAU of 30, you would need two ounces of 15 AA% hops.

    Hops add a lot more flavors then just bitterness, and these flavors can lend themselves to different styles.  One way of classifying hops is by the most frequent use for them:

    • Bittering – These are hops that are being used primarily for their AA% and to bitter the beer, they will be added at the beginning of the boil, and be boiled for 45 minutes or more.  This will drive out most of the flavor and aromatic components of the hop.
    • Flavor – These are hops that are used with 30 – 15 minutes or so of time remaining in the boil.  These will add some flavor, but most of the aroma notes from the hops will be driven off.
    • Aroma – These are hops added towards the end of the boil, or even after the boil has ended (either in a whirlpool or through dry hopping).  These will add little to no bitterness, but will retain all of their aroma and flavor notes.

    Another type of hops are the Noble hops.  This is a special category of four different varieties of hops (Hallertau, Saaz, Spalt, and Tettnang).  The term just came into being in the past couple of decades, and the hops from their original regions are generally in high demand. These classifications are more of guidelines, as any hop can be a bittering hop if enough of it is used, and some bittering hops have some very good flavor and aroma notes.  Hops can have a wide variety of flavors, with the most common being: earthy, pine, citrus, spice, grapefruit, and tropical fruit.

    Another use for hops is dry hopping.  This is when hops are added to the beer after the yeast has been pitched, and will add no bitterness, but will add tons of aroma.  There are even some beers being released now called 0 IBU beers where all of the hops are added at the beers flameout, or used as dry hops.

    New and experimental hops are being cultivated every year for new characteristics, such as disease resistance, flavor, and high alpha acid percentage.  These are generally released in small batches to breweries and home brew shops. At this point they’ll generally have letters and/or a number to identify them, only getting a name when they go into wide scale production.

    If you say you don’t like hops, it can help to learn the varieties so you can learn which ones you don’t like.  There are also several hops that can add negative qualities to beer if used with too heavy of a hand (garlic, catty, vegetal, etc.).  Good brewers will avoid this, but not all breweries use good brewers.

  • Enslaving Yeast – All Grain Beer Part 1 – Malts and Adjuncts

    Enslaving Yeast – All Grain Beer Part 1 – Malts and Adjuncts

    At this point, you may have two batches of mead, a batch of wine, a batch of cider, and a batch of beer fermenting away in your basement.  So, let’s take a step away from making something this week and start going over the main ingredients in beer.

    First, what is malt?  Malting is a process to soften the outer husk of a grain, and allow access to enzymes that break down starches into sugars.  This process has several steps which are:

    1. Germination – The grains are mixed into water in a dark room to begin the germination process.
    2. Kilning – At this point the grain is dried and heated.  The heating will change the quality of the grain making different types of malt (we’ll get to those in a bit)
    3. Cleanup – Now they want to break off the little dried out rootlets that have sprouted, test the malt to check the quality and the specs of this batch.

    Many grains can be malted (including corn, wheat, rice, and oats), but barley is the main one for beer.  Malts can be broken down into a couple of broad families:

    • Base Malts [Diastatic Malt] – These malts have enough diastatic power (measurement of the amount of enzymes present in the malts) to convert the starches in themselves and a certain amount of other malts.  The main ones used in beer are referred to as 2-row and 6-row (based on the structure of the head of barley) with many regional ones being used for specialty beers (Marris Otter – British, Munich – German, Pils – Pilsners).  These can add biscuit and bready notes to the beer.
    • Crystal/Caramel Malts – While the process to make Crystal and Caramel malts is different, the end result is very similar and at the homebrew level the two terms are generally used interchangeable.  These are malts that have been roasted and to force the sugars to be modified into a non-fermentable state. These are referred to by their Lovibond rating (this is a measure of the color, the higher the number, the darker).  These malts will add body, some caramel notes, some sweetness, and (for the darker ones) some roasted notes.
    • Specialty Malts – These are used in small amounts for specific characteristics they can impart to the beer.  Carapils is a popular one that’s said to increase head retention and body, smoked malts have been smoked and add that flavor, chocolate malt will add chocolate notes, roasted barley is non-malted and will add a dark color and roasted flavors.  Technically all Crystal/Caramel malts could be considered specialty malts as well.

    A beer recipe will generally have between 50-75% of the grist (crushed malts) made up of base malts, with the rest being crystal/caramel or specialty malts.  You can also make a beer with nothing but base malts or just a single base malt. The vast majority of the time, you can also freely swap between base malts (although it will change the flavor) in a recipe, unless it’s using a large amount of specialty malts or adjuncts.

    Now that I’ve mentioned adjuncts, I should probably explain them.  When talking about an adjunct in the brewing world, you’re referring to anything that isn’t malted barley (or wheat in some cases), hops, water, and yeast.  So rice, corn, oats, and rye are all adjuncts, as are Candi syrup, table sugar, or fruit juice. Spices, vegetables, fruits, and herbs also qualify. Do adjuncts make a beer bad?  No, forget the Reinheitsgebot.  It was passed to protect the income of nobility who were making wheat beers.  It sets price controls!

    So why use adjuncts?  The main reason is for different qualities that the grain and sugar additions can make.  You want that creamy mouthfeel of an oatmeal stout? You need to use some oats. Want to make a milk stout?  You’ll need to include some lactose (milk sugar). The other is flavor, there’s nothing wrong with a good fruit beer, or a nice spiced porter.  According to a couple of books I’ve read, some of the Belgian breweries (if you drink good beer, you’ve probably had their stuff) use flour as an adjunct in the mash.  And you can’t say the Belgians don’t make good beer.

  • Enslaving Yeast – Extract Beer

    Enslaving Yeast – Extract Beer

    Yes, at long last we’ve stepped through the various ways of making alcohol and have made it to the hardest to make.  Beer. Over the next couple of installments, I’ll be going a bit more in depth on the ingredients used to make beer, but let’s get started with the equipment you’ll need to make a simple extract batch.

    To begin with, the first thing we’ll need is a brew kettle.  Unlike most other types of fermentation, beer requires being brought up to a boil for a time in order to sterilize it, use the alpha acids in the hops, and to help get a clear beer.  Any kettle can work for a brew kettle, as long as it’s large. Most will also have a spigot put into them to allow you to get your wort (unfermented sweet barley water) into a fermentor more easily.  Now, most beer recipes for homebrewing are written for a 5 gallon batch, that means if you want to do what’s called a full boil (the full volume of beer is boiled at once), you’ll need at least an 8.5 gallon kettle.  Why the extra 3.5 gallons?  Well, first you really don’t want a kettle full of boiling liquid full to the brim.  Second, you’ll be boiling off water as you get the wort up to a boil, and during the time it’s boiling.

    Then, you’ll need a wort chiller.  While wort chillers are technically optional, you’d be hard pressed to find someone telling you they aren’t a worthy investment.  You can make your own fairly easily as long as you have access to copper (or stainless steel) tubing, a way to bend it, and a way to get hose attachments on to it.  Wort chillers are used to bring that boiling pot of wort down to a temperature where it’s safer to move it between vessels, and bring it down to a temperature where you can pitch your yeast.

    But Nephilium, I’ve got this 4 gallon pot, and SWMBO (She Who Must Be Obeyed) has said that I can just put an ice bath in the tub to chill my beer.  If you can’t do the full boil, you’ll be doing what’s called a partial boil. This means you’ll be boiling a partial amount of your total volume, then topping it off with water.  Since the top off water doesn’t have to be boiling it will help with the cooling process. In general, if your tap water is safe to drink, you can just add it directly in for the top off, although that has a risk of infection.  If you want to be safer, boil the water once, let it cool, and put it into a sanitized fermentor a day or so before.

    Finally, we’ll talk about the two different basic types of malt extract.  You can buy it either in a liquid form (LME) or in a dry form (DME). The liquid form will have the consistency of syrup, is slightly easier to mix into hot water, but will spoil faster and is harder to do measurements of.  The dry form will have the consistency of powdered sugar, which means it’ll very easily coat things with a sticky mess, but can be kept around much longer as long as it’s kept in an air tight package and away from humidity.

    So let’s go with a recipe.  This is for a basic Saison, a style that is more descriptive than prescriptive. It is a traditional style brewed in France and Belgium at the time of the harvest, and was used to pay workers in the fields.  I’d recommend following the recipe as written once, but then you can adjust it by adding rose hips and lavender, tart cherries, currants, peach juice, or whatever you would like.

    Base Saison: 90 minute boil; Final volume 5 gallons

    Ingredients:

    2 lb. Wheat Dry Malt Extract
    3 lb. Pilsen Dry Malt Extract
    3 lb. Extra Light Dry Malt Extract
    2 oz. Saaz hops
    1 package Saison yeast (make sure it’s not a bacterial blend), I’ve had great results with the White Labs WLP565.
    ~7.25 gallons water (your amount may differ based on different boil off amounts)

    Note: If you can’t find DME, you can substitute LME for it, just up the amounts by about 10%.

    Method:

    Prepare all of your ingredients, you’ll be separating the hops into two amounts 1.5 oz and .5 oz.  Get your water up to a boil, then we’ll be adding the malt extract. Turn off the heat, add in the extract and stir.  Then stir some more. Make sure the extract is mixed into the water. Get the water back up to a boil, and once it starts boiling put in 1.5 oz of the Saaz hops, and start your timer.  70 minutes into the boil (20 minutes before you turn off the heat) add in the last .5 oz of hops, and your wort chiller (but don’t start the water flow, we want to sanitize it). When your timer runs out, turn off the heat, and turn on the water flow for your wort chiller.  You’ll need to move the wort chiller around every once in a while to help chill it down. It’ll take 20-30 minutes at least to chill your wort. If you want to pull a sample to check your gravity, it should be at about 1.060.  At that point, move it to your fermentor and pitch your yeast.  Let it ferment for 3-4 weeks, as the Saison yeasts can take some time to finish off, and the beer should finish up at around 1.005 (or lower).  Saison yeasts are fairly heat tolerant, so you don’t need to worry so much about fermentation temperatures, but just keep the beer stable.  After it completes fermenting (remember, 2 checks at least three days apart with the same gravity reading) bottle it, let it condition, and enjoy it.

  • Enslaving Yeast – Mead

    Enslaving Yeast – Mead

    So we’ve made cider and wine, let’s move on to what is commonly claimed to be the oldest fermented beverage in the world, Mead.  What is mead? Mead is a fermented beverage where the majority of the sugars are coming from honey. Honey is naturally antibiotic, and is unique in that it doesn’t spoil (while it will crystallize, it stays edible).  So, since we want the yeast to survive, we’re going to need to water it down. There’s several different paths you can go to add water to the honey, each with different drawbacks:

    1. Boiling – Get water up to boiling, then add in honey.  This runs the risk of scorching the honey, as well as driving off aromatics, but will ensure that the honey is equally mixed into the water.  You’ll also need a way to cool the must before putting it into a fermentor and pitching yeast.
    2. Hot water – Get water up to ~160 F, and mix in the honey.  This will help the honey dissolve, but will drive off some aromatics.  This also may require some method of cooling before putting it in a fermentor and pitching yeast.
    3. Cold water – Mix water with honey.  This will require more mixing and more stirring to make sure the honey is fully dissolved, has the highest risk of infection (still not a high one), but preserves the honey aromatics the best.

    You won’t need any new equipment for making mead, but you may need a couple of additional ingredients.  Yeast nutrients and yeast energizer.  Fruit (and barley) have the compounds that yeast need naturally occurring in them, honey does not.  While you can make mead without yeast nutrients and energizer, using both will help the yeast do well and convert the sugars into alcohol.  With the cost of honey, it’s well worth the extra couple of dollars to ensure a good ferment.

    There’s an ongoing debate in most of the mead forums about the best way to use yeast nutrients, with everyone certain that their way is the best (sound familiar?).  You can either add it all in at the beginning of fermentation, you can do step additions (add 25% at the beginning, then an additional 25% each following week).

    For those who think there’s too many different styles in beer, there’s a large list of different types of mead.  For those of you here, I’m guessing the most popular will be:

    • Braggot – A mead made with malted barley and honey
    • Capsicumel – A mead flavored with chili peppers
    • Cyser – A mead that users cider instead of water to dilute the honey
    • Hydromel – A light/low alcohol mead (think around 5% ABV)
    • Pyment – A mead that uses grape juice instead of water to dilute the honey
    • Sack mead – A strong mead with more honey then a standard mead (to get to ~15% ABV)

    For your standard mead, plan on between 2.5-4 lbs.of honey per gallon.  Adjust as you wish for higher/lower ABV, and based on if you’re using a fruit juice to dilute (which will have sugar of its own).  Be aware of the different types of honey, and realize that they will have different flavors when the fermentation is done. I recommend starting with small batches until you find something you like, then ramping that up to a higher volume.

    Now for the recipe of a mead I made that came out really well, and should be ready for your next Thanksgiving.  Yes, I’m talking about the one in 2019, most meads do well with a lot of mellowing and aging on them.  Since it’s a 1 gallon batch, I generally bottle this into about ten 375 ml bottles instead of risking only getting four and some change into 750 ml bottles (remember that there’s sediment you don’t want in your bottles).

    Cranberry Mead (1 gallon batch):

    • 1.5 lbs Cranberries – Reduced to juice (or just buy cranberry juice)
    • 3.5 lbs honey
    • Water to top off to one gallon

    Blend the cranberries (or buy juice) and run the resultant liquid through a filter.  Mix that with 3.5 lbs. honey and top off with cold water to get to one gallon. Shake it up (which will both aerate it, and make sure that the honey is mixed in with everything else) until the honey is dissolved.  Figure out what nutrient schedule you want to use, and pitch a white wine yeast. Fermentation will take at least a month, so be patient with this one. After fermentation is done, wait for it do drop clear (sediment will settle at the bottom of the carboy), then bottle it up.

  • Enslaving Yeast – Wine

    Enslaving Yeast – Wine

    wine kit

    Time to move up the level of difficulty to making something that has a couple more steps… wine.  While you can harvest your own grapes, and crush them yourself, in the modern day it’s usually easier to buy a wine kit.  You can find kits for making 1 gallon batches or 6 gallon batches.  These kits will come with everything you need to make a batch of wine (including a dry yeast packet).  The kits will come with a plastic bladder full of grape juice concentrate, which you’ll put into a bucket (or carboy), and mix with warm water to get up to your total volume.  Then you stir, and stir some more, and keep stirring to make sure that everything is mixed well. Your kit may come with some packets of items to be added in at this time (wood chips are common), follow your kit instructions here.  At this point, you can take a sample and measure your gravity (if you want to know the starting gravity), check the temperature (to make sure the yeast won’t die), and pitch the yeast.

    After a couple of weeks, the primary fermentation is done.  At this point we want to minimize contact with oxygen, so we’ll move it from the bucket into a 6 gallon carboy.  Use a sanitized siphon to move it over, and add any additions that your wine kit say to add. Then put on an airlock, and let it sit for another couple of weeks.  Once fermentation is done (check this with your hydrometer), the final gravity will generally be below 1.000.

    Now, fermentation should be complete, but we’re not done yet.  Next we need to clarify it and degas it. Yeast breaks down sugar into alcohol and CO2, depending on the ambient temperature, some amount of that CO2 will have been absorbed by your wine.  Most styles of wine do not have carbonation, so we need to do something to get that gas out. You can either take up more stirring (over 5 minutes, go ahead, count it out) or you can use a degassing wand.  These labor saving tools go into your drill, and make degassing much easier.  For clarifying, your kit will most likely have a couple of packets that need to be added in a certain order.  Follow the instructions (or if you’re really patient, you can wait and the wine will eventually drop clear) with your kit (side note for those who are vegetarian, keep in mind the clarifying agent is where you may find animal products).

    Back to waiting for a couple of weeks (or as your kit says) for the clarifying agents to work their magic.  Now, you just need to carefully siphon of the wine into bottles (without stirring up that layer of sediment at the bottom), and cork or cap them.  If you corked them, stand them up for 3-4 days for the corks to seal, then you can store them on their side. At this point, you’re done and will have around 30 bottles of wine (assuming a 6 gallon batch and standard 750 mL bottles).

    Sorry for the lack of recipes this time around.  The only non-kit wine I’ve made is beyond the level that I’ve gotten to in these tales.  But if you want to follow it, you can find it here.

  • Enslaving Yeast – Cider

    Enslaving Yeast – Cider

    Let’s move onto something simple and seasonal.  Cider. Cider is pretty easy to make, it requires cider (or fruit juice) and yeast.  To make hard cider, find cider you like to drink (find ones without any preservatives other than ascorbic acid), and add yeast (this will happen naturally if you let it sit in an area that’s about 65 F but it’ll taste better if you select the yeast and pitch it).  I’d recommend buying a batch of yeast from your local homebrew store (it’ll cost you about $8 assuming average prices).  Put the yeast into your cider, slap on a sanitized airlock (you remember we talked about both of these things, right?), and let it sit for a couple of weeks.  Keep in mind that everything that touches your cider needs to be sanitized, unless you want to make sours, which will be a much longer and involved series of articles.

    How will you know when it’s done?  Time for the next pieces of homebrewing equipment you’ll need.  A hydrometer and a wine thief.  The wine thief will be used to pull a sample of your fermented cider to test it with the hydrometer (remember to sanitize it).  The hydrometer is a device that is used to measure the specific gravity of a liquid. Pure water has a specific gravity of 1.00.  Alcohol has a lower gravity (about 0.78), and sugar adds to the specific gravity of a liquid. So those OG and FG written on brewery stats, and on the sides of some of your bottles, are just a measurement of the Original Gravity (measure of how much sugar was in to start) and the Final Gravity (measure of the specific gravity after fermentation).  Keep in mind that hydrometers are calibrated to be used at a specific temperature, and if your liquid is a different temperature, you’ll have to adjust that. There’s lots of calculators online to do that math for you. With both the OG and FG of your beverage, you can figure out the percentage of alcohol.  If (and only if) you sanitized your hydrometer and sample tube, you can pour the sample but it does increase the risk of infection.  Most people just drink the sample (or pour it out).

    But back to finding out when your cider is done fermenting, what you want are two readings, at least three days apart with the same gravity reading.  Do not bottle without verifying that fermentation is done. Bottle bombs are a real thing, and can be very dangerous. Do not assume fermentation is done because you don’t see any airlock activity or bubbling in the cider.

    If you want it to be carbonated, then you’ll need to add sugar at this point (here is a decent calculator, but assume just under an ounce a gallon).  Take your sugar, and mix it with boiling water.  Then add it to the cider (stirring with a sanitized spoon) and then bottle it. To bottle, you’ll need a siphon (points at the equipment article), and a bottling wand.  Bottling wands are  a tube with a spring loaded stopper at the bottom. Push it down, liquid flows out. Lift it off the bottom, the bottom locks up. If you’re using swing tops, mix your sugar into your fermented cider (with a sanitized spoon or your siphon), and then bottle.  If you need to cap or cork your bottles, I’d recommend filling them all before doing that, or use an orphan assistant for the capping/corking.  After that, let them sit for about 3-4 weeks in a room that’s close to 65 F so they condition up (fancy term for letting the yeast eat the extra sugar to make carbonation).  Then put them in the fridge and enjoy.

    Keep in mind, if you like your first batch, you can easily modify your second batch.  Add simple things like ginger, cinnamon, cloves, or whatever. The longer you let the cider sit on the spices, the more flavor it’ll pick up.  For your first attempt, I’d recommend no more than 1 tbsp. per gallon, it’s always easier to add more spice, or let it sit on the spices longer, but you can’t easily take the flavor out.

  • Enslaving Yeast – Basic Equipment

    It appears a lot of you degenerates are interested in making your own alcohol (or rather, using yeast to do it for you).  Thankfully, this is legal in the US (as long as you’re not making more than 100 gallons). I’m going to start with the basic equipment you’ll need and some starting tips:

    1. Cleanser – Cleanser is needed to clean up all of your items that will be used in the process.  You can buy PBW (Powdered Brewery Wash) or any of the knock offs. Personally, I generally use OxyClean free for my cleaning needs.
    2. Sanitizer – Here, I recommend StarSan.  While you can use bleach or other household products, StarSan is cheap, effective, non-toxic, and no rinse.  Sanitization is a critical item, everything that touches your beverage needs to be sanitized. This will keep the risk of infection low.
    3. Fermentor – This is where the magic happens.  You can use food grade buckets (7 gallons) or carboys (glass or plastic).  You can find fermentors in almost any size you want, but the standard sizes in the US are 1 gallon, 3 gallon, 5 gallon, or 7 gallons.
    4. A siphon – This will be used to move beverages between containers and minimize oxidation.
    5. An Airlock – There’s two basic styles, a three piece and an s-shaped one.  I prefer the s-shaped ones, but if anything gets inside of it, they’re impossible to clean.  Thankfully, they’re cheap. These allow gas to escape the fermentor while preventing outside air (and bugs) from getting in.
    6. Empty bottles – You can buy them, or save up from your other ones.  If you’re planning on capping, realize that you can’t use screw top bottles.  If you like Grolsch, the swing top bottles will mean you don’t need the last item on the list.
    7. Capper/Corker – Depending on what you want to make, and how you want to serve it.  You’ll need to either cap or cork the bottles at the end (yes, you can cork beers, and cap wines if you wish).

    Keep in mind the difference between clean and sanitized.  Items need to be cleaned before they can be sanitized, and cleaned items can still cause infections.  Anything that comes in contact with your must/wort (unfermented wine/cider/beer) needs to be sanitized.  Don’t skimp on this step, follow the instructions on your sanitizer, and understand it.

    Keep notes.  Write down everything.  Almost every brewer has a tale about this really great beer/mead they made where they made a mistake part way through the process, and it made the best beverage they ever had… but they forgot what they changed in the process, and haven’t been able to reproduce it.

    Relax.  People have been accidently making wine and beer long before they knew what they were doing.  The worst you’ll do is make a batch that doesn’t taste good that you’ll have to dump.

    Don’t expect to save money right away.  This is a hobby with large upfront costs.  If you keep doing it, you’ll eventually be making beer/wine whatever for cheap, assuming your time costs nothing.


    It seems a bit of a waste to talk about fermentation without giving a recipe or project, so here’s a great starter recipe:

    Joe’s Ancient Orange Mead

    Makes 1 gallon.

    3.5 lbs honey (clover or a blend)
    1 large orange
    1 small handful of raisins
    1 stick of cinnamon
    1-2 whole cloves
    1 teaspoon Fleishmanns bread yeast
    Water to fill to a gallon.

    Wash the orange, and cut into eighths.  Clean your 1 gallon carboy (glass jug) and dissolve the honey in warm water.  Once it’s dissolved, put it into the carboy, along with the orange (push it right on through the opening), the raisins, the cinnamon, and the cloves.  Fill up to about 3 inches from the top with cold water. Shake it up (with a lid on, or not, but it’ll go better for you with a lid). Once it’s all mixed up and at room temperature, add the yeast and put on an airlock (or a balloon with some holes in it).  Stick it in a cupboard in the kitchen in the dark. After about a week, you can top it off with more tap water. Then just leave it alone for a couple of months, it will eventually drop clear (and the oranges will eventually sink as well). Once it’s clear, it’s done.  Just siphon into bottles and cap or cork them.

  • Nephilium’s Games Corner – Kicking What Now?

    Sturgeon’s revelation: “Ninety percent of everything is crap.”


    There have been close to 15,000 projects for board games on Kickstarter.  If we just go with the ones that were successfully backed, we’re probably at about 60% of that number, and at least 90% of them are crap.  Today I’m here to talk about some of the ones that aren’t crap, and some signs that the game project you’re looking at may be part of that 90%.


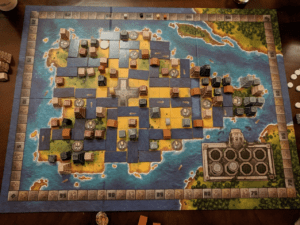
    Game 1: Scythe – Steampunk, alternate WWII, and engine building (2-5 players; 7 with expansions)

    When most people look at Scythe, they see a wargame with sculpted mechs and characters.  This is not a wargame, if you go in expecting a lot of combat and dice rolling, you’ll be very disappointed (especially as there’s no dice in the game).  Instead, Scythe is a game of efficiently expanding and building up your faction to score the most points when the game ends. In fact, the biggest random element of the game is the setup, where each player is randomly given a faction board, and an action board.  The faction determines your starting location, special abilities, and piece color. The action board is where the meat of the game is. Each action board has the same 4 top and bottom actions, but they are not paired the same across the boards. On each players turn, the player selects an action, performs the top action, and then (if they are able and want to) perform the bottom action.  The top action items are:


    1. Move – Move two to three units one hex
    2. Trade – Pay one coin to get two resources of your choice or gain popularity
    3. Produce – Select up to 3 hexes that you control to produce resources
    4. Bolster – Draw combat cards or increase your power


    While the bottom actions are:


    1. Upgrade – Pay oil to move an upgrade cube from the top of your board (making a top action better) to the bottom of your board (making a bottom action cheaper)
    2. Build – Pay wood to build a structure on a hex you control
    3. Deploy – Pay metal to place a mech on a hex you have a worker on
    4. Recruit – Pay food to get a recruit, which will give you a bonus when players on either side of you take a specific bottom row action


    The bottom row actions will also give you coins (between 0 – 3).  You cannot take the same action two turns in a row. All of the players are isolated to their own 3 hex peninsula at the beginning of the game, and they all have different methods to move off of that to the center of the board.  As people are taking their actions, they can move to claim encounters (which usually provide a small reward, a big reward for a cost, or a small reward for a cost). As people slowly expand their faction, they are working towards goals.  The game ends immediately when 6 stars are placed by any one faction. Stars are placed for any of the following:


    1. Completing all of your upgrades
    2. Building all of your buildings
    3. Deploying all of your mechs
    4. Recruiting all four of your recruits
    5. Producing all of your workers
    6. Completing a secret objective (each player is dealt 2 at the beginning of the game)
    7. Winning combat (up to 2 stars for this one)
    8. Reaching the top of the Power track
    9. Reaching the top of the Popularity track


    The Power track is used for combat, there are combat dials that allow the two factions involved in a combat to secretly decide how much of their power they wish to spend for the combat.  Each player may also play combat cards based on how many units are involved in the combat. Both players reveal simultaneously, spend the cards, the power, and the winner is decided. The winner is the player who’s total power spend was the highest, with the attacker winning ties.  The losing player’s pieces are all returned to their starting space, and the winner now controls the hex. You may have noticed that I’ve talked about controlling hexes multiple times so far. The reason the control of a hex is important is that unlike most games, resources stay on the game board, and can be spent from any hex you control.


    The Popularity track is critical in this game.  There are three tiers of Popularity, which give you three different values for items for end game scoring.  Popularity is hard to gain, but can be very easy to lose. If you attack someone, and force their workers back to their home base, you lose popularity.  Encounter cards that give you a big reward for a small price, that small price is usually popularity.


    One other special location on the board is in the middle.  It’s referred to as the Factory. Whoever controls it at the end of the game counts it as 3 hexes for end game scoring, and as a faction moves their character model onto the factory they are able to select a Factory card to add to their action board.  These are usually better options than the standard actions, and have a move that allows you to move a single piece 2 spaces instead of just one.


    At the end of the game, you count up victory points by paying out coins for hexes controlled, every two resources you control, placed stars, and building locations (based on a tile that is randomly selected at the beginning of the game).  The player with the most coins wins.


    Game 2: Roll Player – Character creation has never been so fun. (2-4 players)

    Have you played Dungeons and Dragons at any point in your life?  Then the theme of this game should come very naturally to you. In this game, you are building a character.  You won’t be using the character for anything (although the expansion due out later this year has you fight at the end), but you can see who’s character stuck closest to their “theme”.  Each player starts by either selecting (or randomly being assigned) a race board. These are your standard elf, human, dwarf, dragonkin, etc. races, each of which has some attribute bonuses and penalties.  After that, each character draws a dice from a bag and the color of the die indicates which class card they select. Each class card has two sides, and the player selects which class they want to use. Then each player is dealt a backstory, and an alignment card.  These cards are where players will earn the majority of their points. Class cards have attribute goals, an ability, and a class color. Backstory cards have different color dice assigned to different columns in each of the attributes, and Alignment cards have positive and negative points at different locations.  As complicated as it sounds, the iconography is really well done, and makes it very clear what your goals are. The last part of setup is that each player draws out starting dice from the bag equal to the number of players plus four. These dice are then rolled, and players start placing them into their attributes.  Finally, a market is built out of cards equal to the number of players plus one. The game is then played in phases:


    1. Roll Phase – The starting player pulls dice equal to the number of players plus one, and rolls them.  These are then arranged on Initiative cards in order. So the lowest roll go on the lowest numbered initiative card, and the highest roll go on the highest initiative card.  If two or more dice come up with the same number, the starting player chooses the order for those dice.
    2. Dice Phase – The start player then selects one of the dice and it’s matching initiative card, places the dice in an attribute row, and (optionally) takes an attribute action.  I’ll get to the attribute actions a bit later.
    3. Market Phase – In initiative order, each player may either buy a card from the market, or discard a card from the market and get two gold.  There are different types of cards available: Weapons, Armor, Skills, and Traits. I’ll explain those in a bit more detail later.
    4. Cleanup Phase – Each player may refresh a skill card, the remaining die goes back into the bag, and the leftover market cards are discarded.  The start player then moves to the next player clockwise.


    The game continues until all of the players have filled up their character sheet.  As players place dice into the various attributes, they are able to perform special actions based on the attribute:


    • Strength – Flip any die on your character sheet over
    • Dexterity – Exchange any two dice on your character sheet
    • Constitution – Increase or Decrease the face value of any die by 1
    • Intelligence – Reroll any die you wish, keep either the new or the original value
    • Wisdom – Adjust your alignment in one step up, down, left, or right
    • Charisma – Spend one less gold buying a market card this turn


    Why would you want to decrease a die?  Remember when I said that each class card has attribute goals?  If your goal is 14-15, and you have a 16, you’re failing that goal.  There are some goals that are 14+, and others that are a single number.  Generally speaking, the harder it is to reach a goal, the more points it’s worth.  Your attribute values, dice placement, and alignment can grant you quite a few points (~20 for hitting everything exactly); however, you can also score a good deal of points based on the cards you’ve purchased.


    • Weapons – Grant special abilities or bonuses going forward.  The will have a picture of one or two hands on them, you may not have more than two hands worth of weapons at a time (but you can discard them as you wish)
    • Armor – Set collection, and grants points based on how many pieces you’ve acquired, with a bonus point if it matches your class
    • Skill – Special abilities that you can use as long as you can move your alignment tracker as indicated on the card.  You only refresh one each turn, so although you can do a turn of using four skills, next turn you’ll only have access to one of them.
    • Traits – Here’s the big points.  When purchased, these will adjust your alignment (if possible), and at the end of the game can be worth a large number of points.


    At the end of the game, players total up their points, and the highest value wins.


    What are the warning signs you can find in a project?  


    1. It’s a first time creator – You’ll have quite a few projects where it’s the creator’s first project.  That’s a big warning sign (especially if they haven’t backed any projects). The less you know about something, the easier it seems.  You’ll see first time creators having their printings being done in China, and be ignorant of the shutdown that happens during Chinese New Year (a full month).  Or they’ll have been way too optimistic with the costs for things, shipping isn’t cheap, nor is art.
    2. Lots of flash, no substance. – Lots of buzzwords, lots of mock-up images, lots of stuff to draw you in.  But what’s missing? Rulebooks, play test descriptions, notes on balancing. They may have a great idea, but it’s hard work to translate that into a good game, let alone a good game that you’re interested in paying for with the hopes of getting it.
    3. Previous projects have complaints about fulfillment in the comments – Always take a look through the comment sections on the creator’s previous projects (if they don’t have any, refer to warning sign 1).  After removing those who are the overprivileged backers (“It’s been 12 hours since I posted this comment, and you haven’t responded yet. I demand a refund!”). Look for complaints of poor/no communication, delays being improperly managed, late fulfillment (or no fulfillment at all).


    Also realize that most of the good games on Kickstarter will eventually make their way into retail, albeit at a higher cost then you may have paid if you backed the Kickstarter (and without promos).  I know I’ve slowed down a lot on my Kickstarter backing, generally going for obscure expansion (hello King’s Forge), and reprints of games that are out of print.

  • Nephilium’s Games Corner – Convention Edition

    As mentioned in a couple of threads, the girlfriend and I (not pictured) went down to Ravenwood Castle to take part in Hoop and Stick Con, a gaming convention put on by the castle that raises funds for Extra Life (previously, the fundraiser was for Child’s Play… both are worthy charities).  This year’s goal was $9,500 of which $50 from each $75 ticket was donated, as well as half of all room rental costs for the weekend (room rentals included convention tickets).  So it’s a bunch of geeks getting together to play board games, role playing games, eat, drink, and have fun… all while raising money to help sick children.  This is the sixth year of this convention, and the first one I have attended.  Below, I’ve got some pictures and comments on some of the games I was able to get in.  


    Thursday night:


    Arrived after watching the girlfriend freak out after driving on country roads.  It was raining (this was a common theme to the weekend).  We were told our cabins were a short hike to the castle, which while true, did not include the fact that the hike was uphill, on a poorly marked trail that was nearly washed out.  We did not attempt to walk up the path again.  Since we were walking up, we just brought a couple of games.  After dinner we got a ride back to our cabin and drove back up, allowing us to bring up more games.  I managed to teach Topiary to several people, as well as Mexica:

    Both games I taught have simple rules, with some deep strategy.  Both also allow some cruel blocking of other players in the game.  Topiary is a light filler, taking about 20 minutes to play, while Mexica takes about 60-90 minutes to play and has a deeper strategy with less randomness..


    Friday:


    Woke up to rain.  Got cleaned up and drove up to the castle, after a light breakfast we looked around to decide what to play.  More people had arrived, and there seemed to be about a 60/40 split between roleplayers and boardgamers.  The items for the silent auction had been set up, and the girlfriend and I looked over the options.

    She decided she wanted the B. Nektar basket, while I went for the Bell’s basket, the Jackie-O’s basket, and the Heavy Seas basket.  After writing down some bids, we then got some games in.  Today I got to teach Torres:

    Another action point based area control game that the girlfriend had never opened or learned to play that I enjoy.  It plays in about 60 minutes, and has gone through many printings with different variations on the rules.  I also got to teach a game of Isle of Skye, a nice tile placement game with an interesting auction mechanic.  I learned a game called Dragon’s Delta which was an action programming game that had a very mild dexterity element to it.  I played more games of Mexica (I really like this game, and the Iello version is a beautiful printing).  Then I played an Ameritrash game called Fate of the Elder Gods:

    This one I wasn’t too big of a fan of, it seemed to overstay its welcome, and I don’t know how well the elder gods powers are balanced.  But that’s an initial impression after several days being low on sleep, and playing with a bunch of new players.  I’m more than willing to give the game another shot.


    Saturday:


    The rain continues… today after breakfast, I got into a big heavy worker placement game by Uwe Rosenberg:  A Feast for Odin:

    This is not a short game, as it took 4 new players about 3 hours to play through.  Surprising (to us players at least), we all managed positive scores in the end (you start with -86 points).  I won with the lowest winning score in the history of the included score pad at 55.  More games were played, and beer consumed.  For a size of the scale of the castle, this is the main room:

    There were at least three other gaming rooms in the basement, split up between the main pub and two side rooms. The downstairs area was mostly running RPG’s through the weekend.  Although they did have a Crokinole board in the pub:

    That finally made me realize how big this game is.  Looking at most of the pictures, it looks to be about the size of your standard Monopoly game.  This is shockingly wrong.  The playing area of the board is over two feet across.  I got to learn how to play this while waiting for dinner to be ready, and am now looking for a board for my basement.  This is the day that the silent auction completed, and the girlfriend and I won three of the items we had bid on (the B. Nektar basket, the Bells basket, and the Jackie-O’s basket).  During dinner, we found out that the convention had raised $11,587 for the Extra Life charity:

    After this, we played a couple of quick fillers (Topiary again, which I failed to take any pictures of at the convention) while waiting to pay for the silent auction, then went back to the cabin to deplete the alcohol stores we had brought down with us.


    Sunday:


    Today was a slacker day.  Wake up, clean up, pack everything up, and then head up to the castle for breakfast.  No real gaming today, just saying goodbye to the people we met, and watch the girlfriend exchange Facebook information with others.  I then convinced the girlfriend that we should go to Athens, were I saw this appropriation of Libertarian culture:

    And had to find solace in the beers of Jackie-O’s:

  • Nephilium’s Games Corner

    This week is going to be a little bit different.  I’ve been trying to stick with games that are easily available, and for a reasonable price.  This week, I’m going to mention three games that have had availability issues for a while.  All of them are excellent games, and well worth trying.


    Game 1) Colonizing the Empire (or Britannia, or Hispania, or …) – Concordia (2-5 players)

    This is a great game that is unfortunately almost always underprinted.  There was a recent print run in order to support the expansion being reprinted, but it appears to be out of stock at Amazon.  Your local store may have a copy, or you can play this online at BoiteAJeux.net.  Every player starts with an identical hand of cards, two colonists in the starting city, some cash, and some resources.  Each card in the game also has a god’s name on it, which will be used at end game scoring.  The scoring options are:


    1. Vesta – 1 point for every 10 money you have at the end of the game.  Every player gets one of these, and there are no more available for purchase through the game.
    2. Jupiter – Each house you have in a non-brick city is worth 1 point.
    3. Saturnus – Each province you have a house in is worth 1 point.
    4. Mercurius – For each of the 5 different goods you can produce, you earn 2 points.
    5. Mars – For each colonist you have on the board (you start with 6), you earn 2 points.
    6. Minerva – There are 5 different cards here, each for a different kind of good.  They grant you points for being in the cities that produce the goods, ranging between 3-5 points a city.


    The rules for this game are very, very simple.  On your turn, you play a card, and do what it says.  This can have you produce goods, earn money, move colonists (and build houses), place colonists on the board, trade goods, or buy new cards.  Any of the new cards you buy will have a god on them (and the distribution is printed on the board), which will also score you points at the end of the game.  So players are given an incentive to focus on specific gods and scoring methods to get the best score at the end of the game.  The end game is triggered once a player either places his last house or the last card is purchased.  The player who triggered the end game gets a card worth a bonus 7 points, and everyone else gets one final turn.  The only randomness in the game is the order in which cards come out (they are sorted into stacks that are in numeric order based on the number of players), and what cities produce what goods (each is assigned a letter so there’s a set of A cities, B cities, etc.).This game is a mid-weight game that has very little direct player interaction, but lots of indirect player interaction.


    Game 2) Exploitation in the age of sails – Endeavor (3-5 players)

    This game has been out of print for a while, with a reprint on Kickstarter now (my only connection here is as a backer).  The game takes place over seven turns with the following phases:


    1. Build Phase – Players can build a new building
    2. Growth Phase – Players gain Population Markers (workers)
    3. Salary Phase – Workers you pay can be used again (which frees up buildings to be used again)
    4. Action Phase – Players take actions to earn resources, occupy cities, attack other players, draw cards, work towards opening up new area, or pay workers to use them again


    Each player has a board which tracks their statuses in four different tracks: the Industry track, which indicates what level of buildings the player can build; the Culture track, which indicates how many workers they gain each turn; the Finance track, which indicates how many payment actions you can take; and the Politics track, which determines how many cards you may hold after passing.  The player boards can be audited any time by checking icons on buildings cards, and claimed tokens.  


    Each region has a network of cities with tokens on them.  As you take actions, you can occupy these cities and claim the tokens on them.  These will be worth points at the end of the game, as will certain connections between the cities (indicated on the board clearly), and also with their own token you can claim if you control both endpoints.  As you ship, you open up new territories and can claim governor cards (which also grant points on the different tracks).  As the new territories are opened up, players can then expand into them as well.  There are also slavery cards, which can grant large bonuses, but will cause problems if abolition happens in the course of the game.  


    As the board fills up, eventually players will need to use cannons to remove pieces from cities, so that you can move in.  The reprint is coming with a double sided board for different player counts.  This will help keep the board tight, and decisions difficult in lower player count games.


    At the end of the seven turns, the players add up their scores (from cards, cities, connecting paths, buildings, and your level on the various tracks).


    Game 3) Area control while avoiding the king – El Grande

    This is an area control game that relies heavily on bluffing and reading the other players.  The base game has been out of print for a while, and it is currently available only in a Big Box format (with a lot of unnecessary expansions).  One of the interesting aspects of this game is managing your pieces (called Caballeros throughout the rules, they’re blocks or meeples depending on the version of the game).  You start with only so many pieces that you have available, and must move them from an inactive supply (called the Province) and an active supply (called the Court).


    The base game plays over 9 rounds, during which the following phases happen:


    1. Reveal Action cards – There are four stacks of cards, and the top card on each stack is revealed.  These (as well as the King’s Card) are the available actions for the round.
    2. Play Power Cards – The starting player plays a power card from their hand faceup in front of them.  Then in clockwise order, each player does the same.  However, no player can play a card that matches the value of a card that was played before them in the round.  The power cards determine turn order, as well as how many pieces you get to move into your useable area.
    3. Take your turn – Each player takes a turn, which has the following phases:
      1. Move pieces into the active supply.
      2. Select an action card – Each action card has a special action, as well as a listing of how many pieces you may move from your active supply to the board.
    4. End of Round – As Action cards are used, they are placed at the bottom of the deck.  The player who played the lowest action card takes the first player marker, and the round marker is moved down 1 space.
    5. Scoring Round – This happens after the 3rd, 6th, and 9th round of the game.  I’ll detail the specifics below for this.


    Now, the board is split up into regions, each region has an indicator on it as to how many points can be earned in each region.  They can indicate a first, second, and third place for each region.  In the case of a tie, tied players get the next lowest position (so if you have two players tied for first place, they both get second place points).  There will also be a region on the board that has the king in it.  If you control the region with the king (ties are not allowed here), you earn 2 additional points; however, the king’s region is also not allowed to be the target of any action cards or piece assignments.  There is one other special region on the board called the Castillo.  It’s a small cardboard castle that you may assign pieces to during your turn.  The rules state you must clearly announce how many pieces you’re assigning to it, and other players are supposed to keep track (some players prefer to play this as open information, but that’s another column).  There is also a special piece that starts on the board for each player referred to as their Grande (it’s a larger piece).  The Grande is the home region for each player, and works to provide 2 additional points if a player controls their home region (no ties).


    Everyone still with me here?  I know the game sounds complicated, with lots of moving parts.  It really is an elegant design, and quite simple to follow the rules after a couple of rounds.  The key points so far is that you want the most pieces in high scoring regions, with your Grande, and with the king.  Now onto the scoring round, this happens through several phases:


    1. Chose a secret region – Each player has a dial that allows them to select a region secretly.  Each player does this, and it will come into play in the third phase here.
    2. Score the Castillo – This is the first region scored, as the pieces in the Castillo get revealed here
    3. Move the pieces from the Castillo – Remember that secret region?  Now you move all of your pieces you had in the Castillo to the region you selected (unless you chose the region the king is in – that region can’t be targeted by anything)
    4. Score the Regions – The board has a helpful guide to walk you through each region to make sure you don’t miss any
    5. Bonuses – Assign the bonus points for the king’s region and the home regions.


    At the end of the game, the player with the most points wins.


    I’ll be out of pocket for a bit at a convention in Southern Ohio.  I’m hoping to be able to get a write up of the convention to show you that while it may be just geeks playing these games, there’s a lot of us.